08 Feb Using My Womens Fitted Dress Block
My women’s fitted block is drafted past the waist, down to the hip level. It’s currently available as a pdf download here. Although most drafting systems for a women’s bodice blocks stop at the waist, it’s essential for modern or commercial pattern making to have a bodice block that is fitted to the hip line and ready for both shirt and dress pattern making. The addition of length past the hip line to the knee level renders this basic fitted block into a dress block. Drop your centre front and centre back line and side seams straight down to your knee level and square across for the hemline. Check the hip curve of your dress block, at the hipline, to make sure it has a clean curve after you have added the extra length to the knee level.
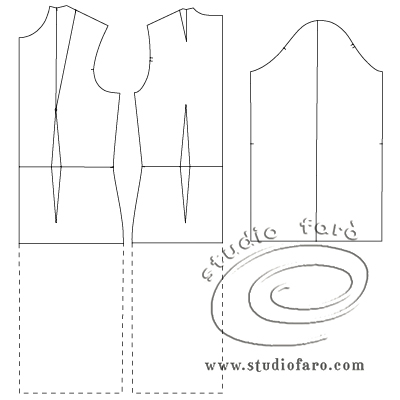
My women’s fitted block is a tailored, rather formal fit with the side seam sitting towards the back of the body. The front block is 4cm wider than the back block. This is a more tailored fitting and entirely appropriate for the many garment types it will become. It’s especially fabulous when used to make a a corset block or tailored jacket block. But I’ll save that fabulous experience for later future blog posts.
First Block Alterations:
- To begin, select the size closest your personal measurements from the size chart.
- Record all your body measurements as a point of reference for future pattern making.
- Drop the centre front and side seam lines from the hip level to your knee level to make this a dress block (as above).
- You’ll make your first fit alterations to the block using your bust, waist and hip measurements. Adding or subtracting from the block as required. This is the best opportunity to do a Full/Flat Bust Adjustment if that’s what you usually do with your commercial patterns.
- Then consider refining that fit, before your first calico toile, with your vertical body measurements (Front length to bust and waist and back length). This set of alterations will make sure the dart and the waistline are in the right place for your fitting.
- More detailed examples of block fit alterations will be posted asap. 🙂
Making your first calico toile of the fitted dress block:
- Add 1cm seam allowances to all seams (side and shoulder seams, armhole, sleeve head and sleeve seams).
- Don’t add seam allowance to the neckline and don’t add hem allowance to the sleeve or body of the dress. This is so the first viewing of your toile shows the finished edge of the neck and dress and sleeve lengths. Seam and hem allowances will get in the way of your assessment of the fit of your dress block.
- Sew in all darts as indicated on the block.
- Stay stitch your necklines (front and back) so they don’t distort.
- Add a zip to the centre back seam that reaches from the back neck to the hip line.
First Toile Fitting:
You may find a number of areas of concern when you first try on your calico toile. Listed below are a number of alterations that regularly come up on the Personal Block Development workshops:
- Catching on the backside.
- Straining at the shoulder – forward shoulder position.
- Rounded back.
- Shoulder slope – square or sloped.
- Tight across the bust. (Full Bust Adjustment post)
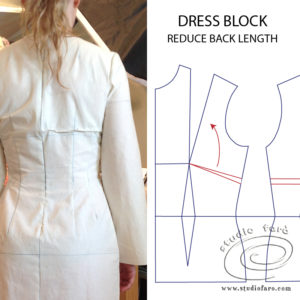
- Back bodice too long (image above and blog post linked).
- Small Waist.
Further Block Developments:
Once you have achieved a good personal fit with this block I’d suggest you begin your pattern making journey with some dress or shirt designs that include interesting dart transfer or princess line panels. This blog post about gape darts covers some basic dart transfer and panel seams for your new dress block.
If your alterations are beyond the information in this post then hesitate to use the comments section below to ask your individual questions.
No Comments