12 Jan Patterns for Pleating Project 101
In this post, I’ll cover the detail of drafting the patterns you’ll need for this permanent pleating project, then follow with the essential pre-pleating preparation in the next post. Have a look at Prep for Permanent Pleating 101 if you’d like some background to this permanent pleating post series.
Pattern Making – Circle Patterns
- The calculation for circle patterns is the same; no matter if your pattern is for a skirt or a collar or a trim for a mardi-gras float.
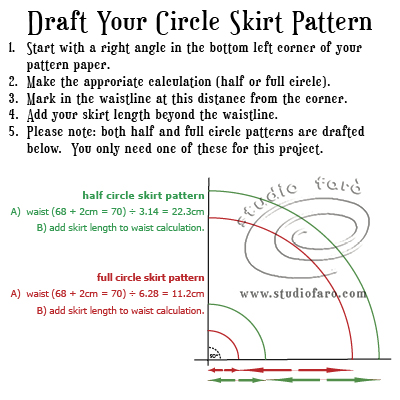
- Decide if you’d prefer a half or full circle skirt for your pleating project. The calculations for both are included in the above diagram.
- The Half-Circle Skirt calculation is: waist + ease / 3.14. This is the measurement you use from the corner of your pattern (the left side right angle) to mark the circle of the waist curve (green in the diagram).
- When you measure along that waist curve, it should equal half of your final waist measurement for the skirt. Add your skirt length beyond the waist curve (outer green curve).
- The Full-Circle Skirt calculation is: waist + ease / 6.28. This is the measurement you use from the corner of your pattern (the left side right angle) to mark the circle of the waist curve (red in the diagram).
- When you measure along that waist curve, it should equal a quarter of your final waist measurement for the skirt.
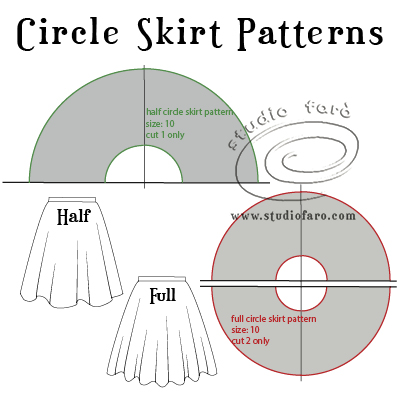
- If you are cutting on the fold, the cutting instructions for the half circle pattern is ‘Cut 1 to fold’ and for the full circle it’s ‘Cut 2 to fold’.
- If you are cutting single lay cloth then follow the instructions in the diagram below.
Pre-pleating Preparation – Sun-ray Circle
For all circle skirts, you’ll need to hang the cut piece for a minimum of two days to allow the fabric to drop through the bias parts of the garment. You can level your half circle skirt on the stand or on the table. If this whole idea is new to you, I’ll be covering this information in the next post in the series; ‘Cut, Hang and Hem before Pleating‘.
Pattern Making – Rectangle Pattern
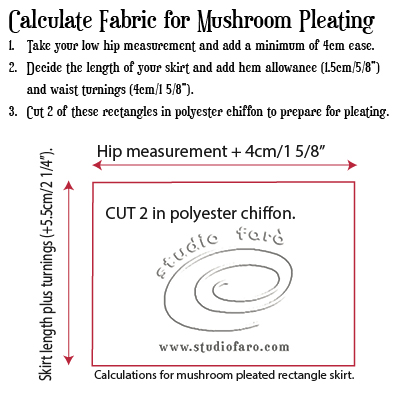
- Mushroom pleating, unlike your regular knife pleats, requires only 2-2 ½ times you hip measurement + ease in fabric.
- I prefer to Mushroom Pleat two full widths of fabric (150cm X skirt length plus turnings), seamed together and hemmed. When the fabric comes back from the pleaters I then assess how much fabric I would like around my backside. Too little fabric will push the pleats to open up slightly and that effect will visually adds inches to your hip area. Too much fabric will bag around your hips and be equally unattractive. As a guide, the skirt featured in the photograph is about 20cm over twice hip plus ease.
- For a Knife Pleated Skirt, you’ll need three times your final hip measurement to allow for the under pleat being twice the size of the top pleat.
- Your calculation for knife pleats would be; final hip measurement (low hip +4cm/1⅝”) X 3, plus seam allowances.
Pre-pleating Preparation – Mushroom Rectangle
Sew only one of the skirt side seams and hem in preparation for pleating. More detail will be available in the next post in this series: ‘Cut, Hang and Hem before Pleating’.
Let me know if you have any questions, I’m always happy to help. 🙂
No Comments