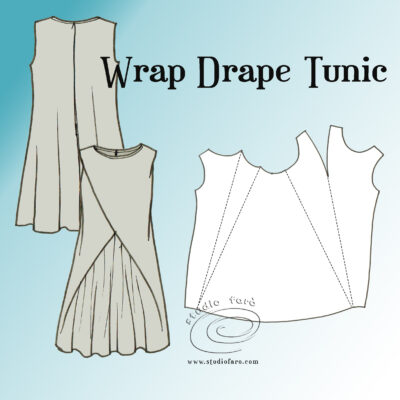
21 Jul Wrap Drape Tunic
Posted at 15:14h
in Fitted Dress Block, Pattern Making, Pattern Making Instructions, Pattern Puzzles
4 Comments
This weeks design follows a current trend for large cross-over tucks as seen in a couple of recent #PatternPuzzles. I know that I am really pushing the envelope with this style. To get the drape right in the front and make sure the tucks are holding everything in place will be quite a challenge. This is probably a good opportunity to remind everyone that these puzzles are ideas only, with guidelines for making the pattern. The proof is in the testing and that’s a creative and technical journey from a well-fitted dress block through pattern making knowledge in the desire of beautiful creations.
For industry product development, a dress of this complexity will take a minimum of two toiles (more likely 3-4) to get the balance right. And it’s not just the cutting but the choice of fabric that is crucial. If the fit on the bust is too tight it will push the drape tucks open and be potentially ugly. If the fabric is too stiff, the front hem drape will stick out in a doll-like fashion. So take a deep breath and be prepared to make at least two toiles, to finesse this pattern, before cutting into your valuable fabric.
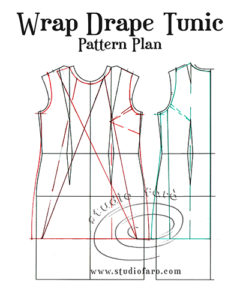
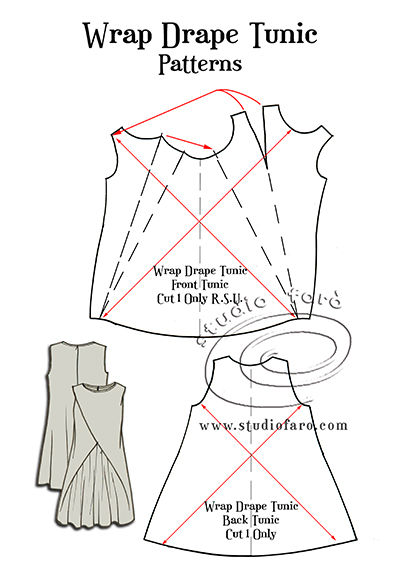
For this design, trace out a full front and a half back fitted dress block:
- Alter the neckline by 2cm along the shoulder, 1cm at CF and 1cm at CB.
- Narrow at the underarm point by 1cm for a sleeveless style down to 0cm at the waistline. Drop the underarm point 1cm.
- Mark in the new armhole 2.5cm away from the Shoulder Point (front & back). Redraw the armhole from shoulder line to underarm, maintaining the same kind of curve that exists in the original armhole.
- Add gape darts to the front and back armholes.
- Soften the fit in the waist and add a little extra to the hip line and hemline of the tunic. I have added 20cm in length past the hip line for my tunic.
- Mark in the cut lines for the flare in this design from the hemline back to the bust darts in the front and through the side body and waist dart in the back.
- Now mark in the fold lines for the two large tucks in the front of the dress. It is important that the under-tuck fits comfortably underneath the top tuck.
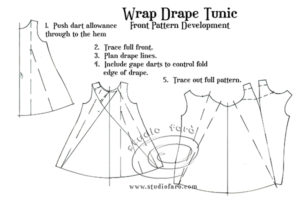
The first stage of pattern development in this design is to use the darts in this block to make the new tunic shape.
- In the front, working on a half block, send the bust and gape darts into the hemline to create the fullness in the front hemline.
- Then copy this pattern out as a full front to develop the large front tucks.
- Think seriously about shortening those front fold lines. In my experience they always need a reduction in length in the first fitting to sit close to the body. I’ve marked gape darts along the outside edge of the left side tuck to reduce the length of the fold line. For the left side (under) tuck I’ve dropped the neck curve down, reducing the length of the fold line by 1-2cm. These particular alterations to the first pattern are a bit of a guesstimate based on my cutting and fitting experience. By that I mean no guarantees, simply a move in the right direction.
- For the second stage of your pattern development, trace out a full front pattern, opening out both tucks with some gape darting on the large tuck fold. Note the large tuck has a dart like shape that becomes a seam on the outside edge.
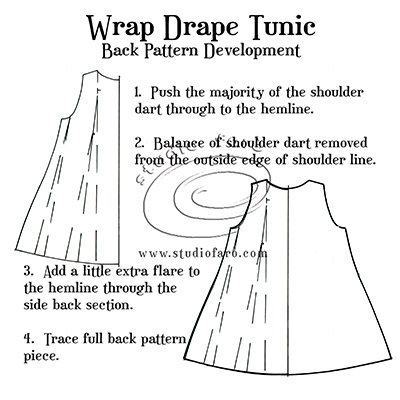
For the back tunic, you can get rid of most of the shoulder dart and the gape dart into the hemline. Extra flare can be added in the side-body cut line. Note this design has much more flare in the front than the back. Your back tunic pattern will be cut on the fold.
The final pattern pieces below are cut on the bias grain to enhance the drape in the front flare. It’s essential that the fabric you use is a soft, drapey woven fabric. I expect that the first toile may need more gape darting along the tuck fold lines. This is best remedied in a second toile when you work out the exact location of the excess length. In the end we would like the tucks to gently hold the front drape in place as shown in the sketch. Fingers crossed and happy cutting! 🙂
If you’d like to buy a copy of these pattern making notes for your own personal use at home you’ll find them here: Wrap Drape Tunic – Pattern Making Instructions.
Related posts:
N M
Posted at 08:30h, 19 AprilGorgeous!!
Studio Faro
Posted at 08:40h, 19 AprilThank you! Let me know if you have nay questions about making this drape pattern. I’m always happy to help. 🙂
Jan Asena
Posted at 17:47h, 05 SeptemberDear Anita,
I absolutely love this dress. I have made a trial version and the left shoulder/bodice section turns out to be 5 layers of material thick after all the fold are made. I guess I am doing something wrong as so many layers doesn’t seem to be correct.
I would really appreciate your help. What am I doing wrong?
Best wishes,
Jan Asena
Studio Faro
Posted at 11:02h, 06 SeptemberHi Jan, thanks for making contact.
I get three layers on one shoulder with the tuck, then one more when you join to the back shoulder. Perhaps more around the neck and armhole depending on the finish you decide to use. Not sure if that is what you mean.
I’d love to see a photo of your pattern. You can either post an image in the review section here: https://www.studiofaro.com/product/wrap-drape-tunic-pattern-making-instructions/ Or join my Facebook group and post there: https://www.facebook.com/groups/studiofaromakers/ Really happy to help work this out with you. <3