30 Aug Full Bust Adjustment for my Knit Block
Posted at 14:28h
in Fitting Patterns, Garment Blocks, Pattern Making Instructions, Sewing Pattern Alterations, Stretch Patterns, Womens Knit Block
0 Comments
This post is specifically dedicated to working a full bust adjustment (FBA) on my knit block. This particular pattern alteration is important for anyone with a bra cup size above B & C. Because we are working with knit, I’d prefer not to include a dart in any of my knit patterns. If you add a Full Bust Adjustment to a woven pattern you’ll usually end up with a side seam dart. For knit patterns I have a different way of dealing with the extra fabric that results from an FBA and that would usually become a dart.
All details following:
Because you’ll be adding extra in the bust area for the FBA you’ll find the best fit is achieved by selecting one size smaller than your actual bust measurement on the size chart. The FBA will bring the garment measurement up to your actual bust measurement.
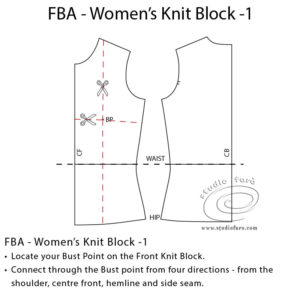
- Most important to firstly locate your own Bust Point. You’ll need two measurements to locate your bust point: Front Length to Bust Level and 1/2 Bust Separation. You’ll find a bit more detail for this instruction on my other FBA post.
- Connect a cutting line through the Bust Point from four directions – from the shoulder, centre front, hemline and side seam (as above).
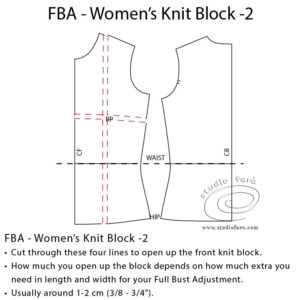
- Cut through these four lines to open up the front knit block.
- How much you open up the pattern along these lines depends on how much extra you need in length and width for your FBA.
- Usually it’s around 1-2cm (⅜-¾”).
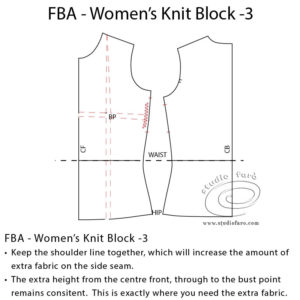
- Keeping the shoulder line together will have the effect of increasing the amount of extra fabric on the side seam.
- The extra height from the centre front, through to the bust point remains consistent. This will give you extra length over the bust as required.

- To account for the extra length in the front side seam, you’ll need notches on the front and back side seam.
- This will trap the eased fabric in the bust level where it is needed.
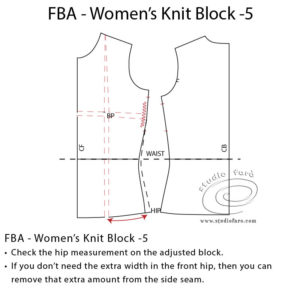
- You now have to deal with the extra fabric and length that has been added to the hip line/hemline.
- If you don’t need the extra width in the front hip, then you can remove that extra amount from the side seam.
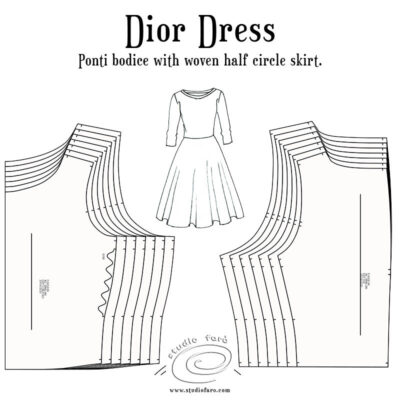
I have used this pattern alteration for larger busts on a dress pattern that is cut from ponti roma. When easing the extra fabric it is enough to stretch the back onto the front side seam. The wriggly line you see on the front bodice side seam is an industry norm as an indicator of easing or gathering of fabric. Any noticeable easing is less obvious once the area has been steam pressed.
This method would work well for up to 3-4 cm (1 ¼ – 1 ⅝”) ease before it becomes a problem and too difficult to ease. In my estimation that means an FBA up to a DD should be ok but anything beyond might prove difficult. Please remember these figures and limitations are all approximate and in no way indicate a rule. Let me know how you go and feel free to ask questions in the comments section below. 🙂
No Comments