10 Nov Cutting out your Pencil Skirt Sewing Pattern
Posted at 13:42h
in Garment Construction, Off-the-Rails Sewing Patterns, Sewing, Sewing patterns
0 Comments
When you’e making your own clothes the first and most important bit of information is what size pattern you’ll be using. To work this out you need the Size Chart (body measurements used to make the patterns), your own basic body measurements (bust, waist and hips), and if possible the pattern measurements as provided by the pattern company. My Pencil Skirt Sewing Pattern has been designed for woven cloth with no stretch and I’ve allowed 5cm garment ease in the fit of the hip on the skirt. So once you know your own hip measurement it’s important that the pattern you use is at least 5cm (2″) larger in the hip. This 5cm (2″) is added to the pattern as garment ease for basic comfort and good fit.
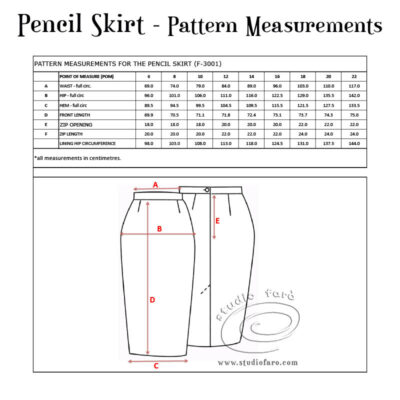
You’ll notice that I have focused on the hip measurement when selecting the best size pattern for your sewing project. My thoughts are that it is relatively ease to alter the waist measurement using darts or the side seam, whereas if you have to alter the hip measurement it is very easy to make a mess of redrawing the hip curve.
Once you have decided on the best size pattern to suit your body measurements it would be a good idea to make a note fo the amount of fabric you need to cut your first skirt. I would also recommend that you make an unlined Pencil Skirt as your first sample so you have the opportunity to finesse the fitting before committing to tailored cloth and lining.
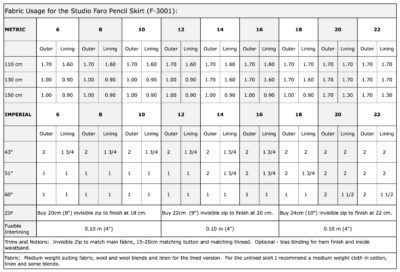
This Fabric Usage Chart for the Pencil Skirt Sewing Pattern has both metric and imperial measurements.
I’ve produced multiple lay-plans for this Pencil Skirt Sewing Pattern and put them together in a full document included in the purchase of the PDF sewing pattern. Your method of marking up and cutting out may vary at lot according to pattern, fabric and your physical circumstances in your sewing space.
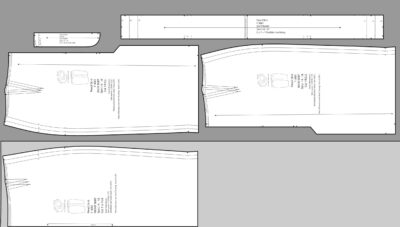
Lay-plan for Sizes 14-18 on cloth 130cm (51″) wide.
I prefer to trace the size pattern I need and make all necessary adjustments on that traced copy on pattern making paper before cutting out my first sample. My favourite method is to lay the patterns in place, checking the grain line is parallel to the selvedge and holding the pattern pieces in place with pattern weights. I use tailors chalk to mark around the edge of the fabric, making sure to mark all notches in the sewing pattern. I then cut all pieces laying them together with the largest piece on the bottom and the smallest piece on the top plus a small scrap of cloth for testing on the machine. I’ll fuse all interfacing where required and make sure I add the trims (zips, elastic, thread, etc.) to the bundle. I then roll it up all together and tie a scrap around the outside and place the bundle on my sewing machine for my next sewing opportunity.

This is my kind of prep. Cut and bundle and ready for any sewing moment.
Full sewing instructions are also added to the purchase of the PDF pattern with photographic images of each step. If you have any questions about my Pencil Skirt Sewing Pattern please don’t hesitate to ask in the comments section below.
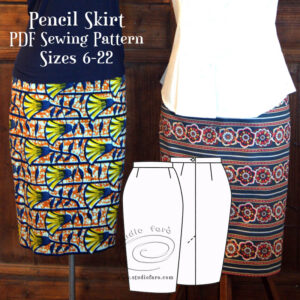
Click on the image above to go through to my sewing patterns.
No Comments