12 Oct Grading Women’s Patterns
Although it may appear complicated, grading sewing patterns is based on a few simple rules with definite numbers added to very specific parts of the pattern for each size up and down the size chart. These rules are used in repeat for all garments within a category (mens, women’s or children). The image below is of a black fitted dress block graded from Size 8 to Size 10 by cutting through the crucial grade points and adding the extra required to go up one size in the pattern. The white lines are these crucial grade points where the extra is added. It is the example I use in my pattern making classes to assist in the understanding of where patterns grow between sizes.

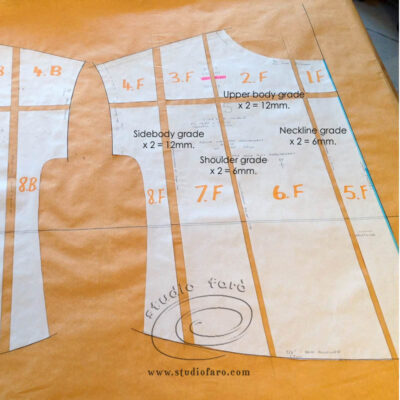
In the clothing industry we use a 4cm or 5cm grade increment rule (refers to the horizontal increase, but/waist/hip) between sizes, depending on where you’re located. In Europe the standard grade rule of 4cm was adopted along with the metric system. Historically a grade rule of 2″ was standard across the industry, worldwide). In Australia we tend to use the 2″ (5cm) grade rule, although some companies adopt the European 4cm grade rule. Both work as long as you stay consistent with the distribution of that rule across your garment. The consistency I’m referring to is demonstrated in the diagram below. Each cut in the garment is carefully located on the body to represent changes we expect when moving up and down in sizing.
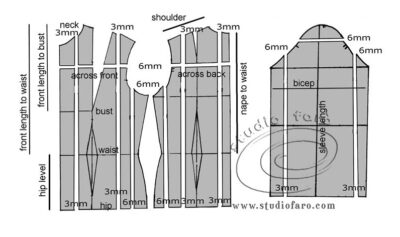
For example:
- the neckline grade is 3mm (1/8″) per size, that runs the full length of the body.
- The shoulder line grade is also 3mm (1/8″) per size and runs the full length of the body.
- And finally the side body grade is 6mm (1/4″) and runs from the underarm the full length of the body.
- This adds up to 24mm (1″) for the half front garment. The same numbers and locations are applied to the half back garment.
- In total you get 48mm (2″) in the full body horizontal grade (bust/waist/hip).
- You’ll notice there is a 2mm discrepancy from a formal 2″ grade in the above figures. That is considered the cost of the conversion from imperial to metric and why many companies moved to the 4cm grade or still grade in imperial measurements.
The vertical grade (growth in the length of the pattern) is located between the shoulder point and the underarm, just above the sleeve notch in the armhole. It’s 6mm (1/4″) per size. You can use this information if you need to alter existing sewing patterns when they are not exactly your size. 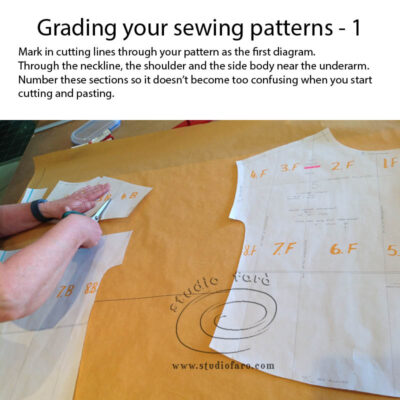
When you decide to grade an existing sewing pattern I suggest you make a clean copy. Then add the cut lines for the grade in the same location as indicated above. Through the neckline, shoulder line, underarm for the horizontal grade. And through the upper body for the length grade. 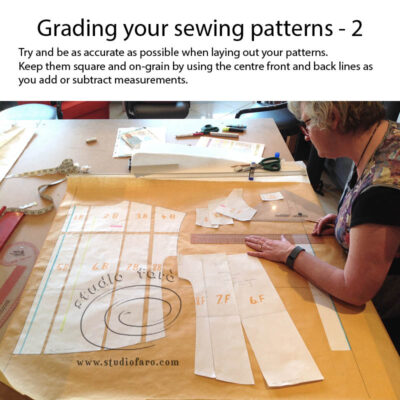
After measuring your pattern and comparing those measurements to your own body measurements you’ll be able to decide how much extra you need in this pattern for it to fit well. It’s this difference that you’ll grade into your new pattern. I suggest that you divide the difference into a quarter then allocate that quarter difference in a ration of 3:3:6 for the horizontal grade. It’s possible that you may not need the vertical grade and you’ll be able to decide that by measuring the length of the pattern and checking it against your own body. 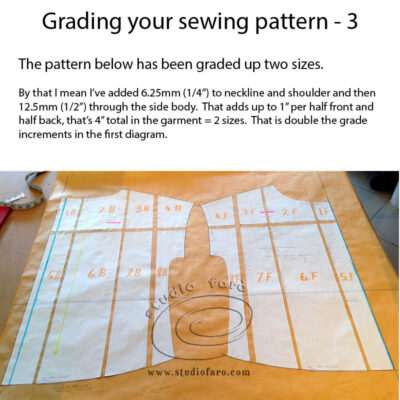
The example above has been graded up by 2 sizes through the neckline, shoulder line, side body and upper body. In the image below I’ve noted the exact millimetres added in each grade.
Double size grade on a commercial sewing pattern.
In the current sewing pattern industry we are spoilt for choice in both design and sizing. I’ve found that the ability to grade to your own size is most needed when you work with vintage sewing patterns. The sizing of our clothing has changed so much in the past 70 years that it’s unlikely vintage patterns will fit many of us these days.
If you have any questions about grading or you’d like some assistance with grading your own patterns you can leave your questions below or jump across to Facebook and join my group: STUDIO FARO MAKERS.
Catherine Lavelle
Posted at 15:12h, 24 MarchThank you so much for posting this information. It’s exactly what I needed to know.
Studio Faro
Posted at 17:18h, 25 MarchThat’s so good to hear Catherine. Feel free to comment again if you have any questions. Always happy to help. Anita
Jody
Posted at 09:49h, 03 FebruaryThankyou for simplifying the grading process. Could you please explain if the grade rules change when for plus sizes ie. do the areas that require grading for a sizes 8-18 change when grading sizes 18-24?
Thankyou for your time!
Studio Faro
Posted at 11:22h, 03 FebruaryHi Jodi,
Yours is such an important question!! Yes the rules do change around or after size 16. The best way to understand the changes is to imagine how a body might change if it were to put on weight and change from a size 14 to a size 16 or 18. Your horizontal measurements get bigger but many of the basics do not. For example your shoulder length is determined by the bone at the end of the shoulder just above the ball joint. This doesn’t change. But your bicep and your across back do increase. So you can imagine that grading above size 16 is quite the detailed art. I would like to recommend Martin Shoben, he has some great books on the subject. Also have a close look at the size charts that some brands have online as a guide. Let me know if you have any questions. 🙂
Jody
Posted at 14:02h, 03 FebruaryThsnkyou!