25 Aug How to get your Sewing Patterns to Fit
Posted at 06:07h
in Fitting Patterns, Pattern Fitting Tutorials, Sewing, Sewing Pattern Alterations
0 Comments
So often the greatest disappointments I hear about making your own clothes are about commercial sewing patterns not fitting how the maker imagined. What’s not always clear is the complexity of size charts and the idea that all garments and sewing patterns use the same sizing system. Not so unfortunately. My own approach is to always ignore the sizing system offered on the back of sewing patterns (size 14 or S M L) and to focus solely on body measurements and desired garment measurements and how the sewing pattern compares. What follows is a description of the first steps, I use personally and teach to my students, to make sure they have the closest sewing pattern size before cutting a fitting toile.
 Try these three simple steps:
- Know your body measurements and desired garment ease.
- Read the pattern measurement charts of centimetres or inches (and not the size numbers).
- Measure the actual pattern pieces (to confirm your size selection).
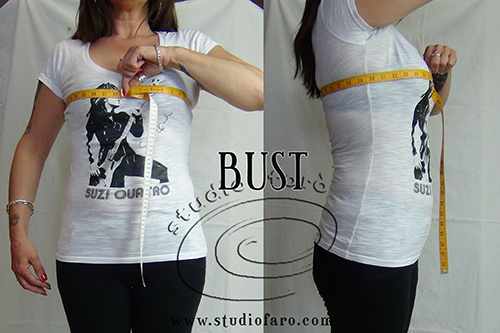
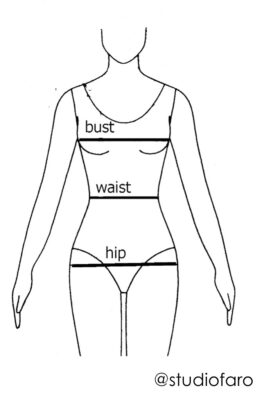
The first step in selecting the best size in your sewing pattern for your next project is to know your own body measurements. At the very least what I call the big three: bust, waist and hip. It’s important to be consistent when you’re taking these measurements and make sure you check and update them with each sewing project. I have a set of instructions here on the website of how to take these measurements that you can reference when you need.
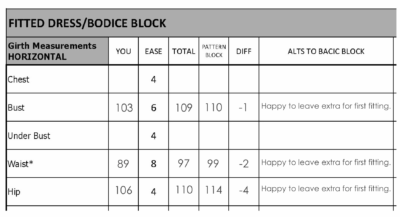
Add garment ease to your body measurements to make sure your garment will be comfortable to wear. For woven garments there is a standard amount of garment ease (chart below) that we use in pattern making to ensure comfortable clothing. Once you have an understanding of those standard additions to our body measurements as ease you can decide how you’d like your own garments to fit. I use the garment ease chart below to make decisions about the amount of ease I would like in every garment. These are not hard rules and can flex according to your fabric, the garment design and your own ideas of fit.
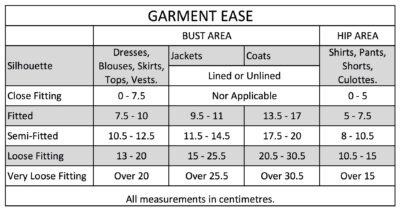
I use a chart (below) when I’m making these decisions and my chart has the suggested minimum garment ease included so it can be easily added to body measurements. Then I will know what final measurements I should be looking for in my new sewing pattern. For a more detailed definition of garment and designer ease you can click through to my glossary on this website.
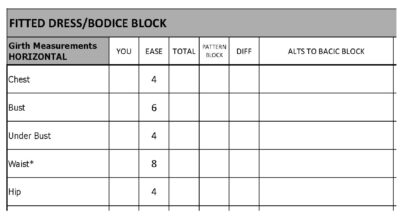
The second step is to use these new measurements you have to select the most accurate size in the sewing pattern. Most commercial sewing patterns have a set of body measurements and sometimes finished garment measurements that you can reference in selecting your size. Use these measurements to compare to your own existing clothing to get a good sense of the final fit of the new style. In the absence of these measurements you can move onto the third and final step.
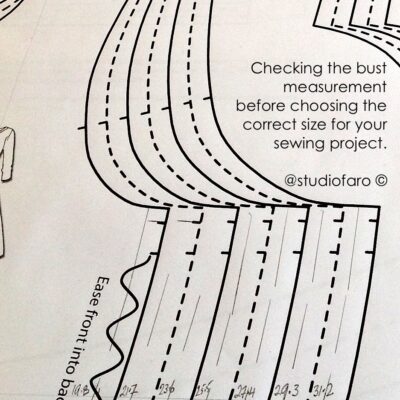
The third and final step will be to locate the best place to take these measurements on your new sewing pattern. Some pattern makers will clearly mark the bust, waist and hip level on the pattern so you can be confident when checking these measurements.
If those markings are missing on your pattern you’ll have to find another way to make sure you’re on the correct part of the pattern when you’re checking measurements. *
The following suggestions are a guide to locating the bust, waist and hip:
- As a general guide you can confidently measure the bust level on your sewing pattern just below the underarm point on your sewing pattern.
- For the waist area it is usually the smallest part of the pattern, below the bust level and approx. 40-50cm from the high shoulder point.
- The hip level is around 20cm below the waist level and is often the largest part of the lower pattern.
*Remember to mark and exclude the seam allowances when your measuring your pattern. Also remember that more often you’ll be measuring half the front and back on the pattern piece and you’ll need to double that measurement to get a full circumference to compare to your body measurements.
On a more basic level it’s also important at this stage to check that the garment lengths on the sewing pattern suit you own desired measurements. By this I mean sleeve, trouser, skirt and dress lengths. If you’re not sure of how to take these measurements you can use favourite garments from your wardrobe to establish a standard set of measurements you’ll use for checking all sewing patterns.
All of the above will help you get closer to an acceptable fit in your first make from a new sewing pattern. To reduce disappointment I always make new sewing patterns in fabric that is not so expensive or precious but similar to my final fabric, known as a wearable toile. This gives me an opportunity to adjust the pattern before cutting into precious or expensive fabric.
Use the comments section below to share your own sewing experiences and ask any questions you may have. Enjoy!
No Comments