22 Jul An Elizabethan Shirt
For a very long time images of the elizabethan shirt as a pattern or garment have fascinated me. I’ve always favoured patterns that use every bit of fabric as they speak of a time when textiles were considered to be of great value. A time when your household was valued by the quality of the textiles produced in the home and worn by the family and often sold to generate income.
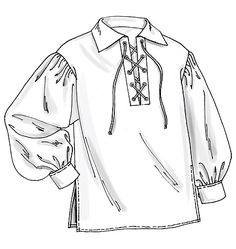
Inspo from Butterick 4486 – especially the lace-up front.
A recent bout of binge watching Bridgerton has set me on the path of working out the best possible zero-waste pattern for an elizabethan shirt. I know they’re meant to be mens attire but that won’t stop me testing the pattern and wearing the shirt.

I’ll take you step-by-step through the process of analysing the instructions available online then working out my best take on the challenge.
Not all examples I found were zero-waste, often with small amounts of fabric left over. In the day I imagine even these small pieces would have been put to good use in the home. However my challenge is to work out a zero-waste version to fit our current desires to be more considerate of the consumption and waste of limited resources.
First Sample:
My first attempt at the shirt was using fabric at 100cm (39″) wide and it was a failure. It might be suitable to make a shirt for an adolescent or child but in my case the sleeves ended up far too sort. The solution if you find yourself with narrow fabric is to use the full width of the fabric for the body and cut the sleeves and trims in the additional length of the cloth.
In this first sample the sleeve is too short and the body fit too close to be a typical elizabethan shirt.
Below you’ll find the many changes and observations I’ve made to this shirt pattern and sample.
Pattern Plan:
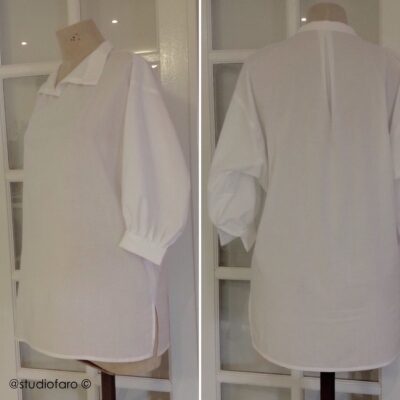
I did find success with fabric at 130cm (51″) wide. The following self-draft pattern plan has all the pattern pieces needed to complete the shirt and is based on a 5cm (2″) grid. It will make a shirt that is a good size medium with a chest measurement of approx. 140cm (45″). With this design I suggest you consider using a large amount of garment ease, at least 20-30cm (8-12″). Click on the link under the pattern plan to download your own copy. Listed below are all the pattern components (9 in total) of the shirt:
-
- front shirt
- back shirt
- sleeves x 2
- collar x 1
- cuffs x 2
- front facing
- underarm gusset
- neck insert
- hanger loop
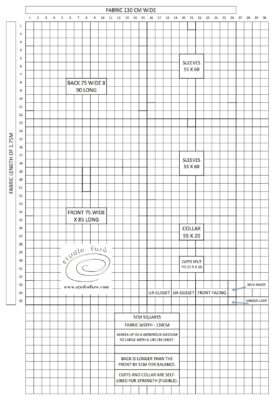
The pattern plan for the Elizabethan Shirt for fabric 130cm (51″) wide to make up a generous size medium.
Elizabethan Shirt Pattern PDF Download
Construction:
The construction of the elizabethan shirt has some very particular finishes that I’d like to highlight and discuss.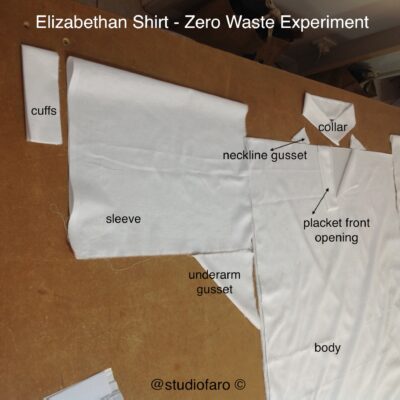 The underarm gusset is cut 15cm x 15cm (6 x 6″) and can be difficult to insert depending on your approach. I decided to attach it to the sleeve side first then sew the completed sleeve to the body of the garment.The neckline gusset is also difficult to insert because of the small seam allowances and pointed end. I found it easier to use a 5cm (2″) square, folded in half diagonally and inserted into the cut end of the neckline. To complete the zero-waste aspect of this pattern I’ve finished it with a hanger loop that can be inserted in the CB neckline.As a pattern maker I have always had a problem with the shape of the collar pattern for this shirt. It’s a straight piece of cloth and all makers out there will know that collars need to be shaped to sit well around the neckline. Unfortunately because the focus in this project is to produce a zero-waste pattern we have to leave the collar as a straight piece. In my pattern I have left enough fabric for both collar and cuff to be self-lined instead of using fusible interlining.The only other thing that is not entirely clear in making up the shirt is the amount of gathers to be included in the sleeve head. So in my pattern I’ve added a notch for the sleeve to be sewn so that the gathers in the sleeve head are located around the shoulder.
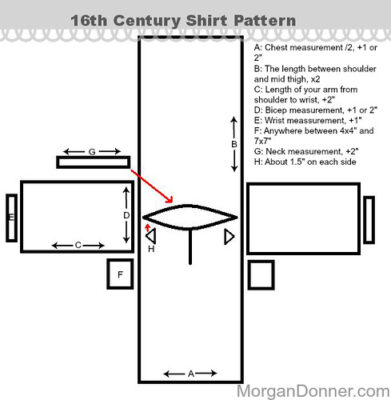
A very clear example from Morgan Donner’s blog. Click through for some fabulous stitching details.
Changes and Observations:
In nearly every example of the pattern for the Elizabethan Shirt I’ve found the neckline placed in the centre of the overall length of the shirt. Meaning the front and back balance are meant to be of equal length. As a pattern maker, if I’m cutting a pattern that is loose fit I will always make the back longer than the front, specifically the back shoulders and neck are placed 1-1.5cm higher than the front. This gives more length over the back shoulder. Without it your garment will tend to drag backwards in wear and feel like it’s choking you. In my shirt pattern above I have exaggerated this difference to 5cm (2″) and this can be reduced to 2cm (3/4″) if you prefer. All that matters in the final garment is that your back is longer than the front.I’ve decided that the addition of Side Seam splits is very important to both the appearance and wearing behaviour of the shirt. It’s often favourable to add these splits to break the hard horizontal line that’s the hem of the shirt.Another issue I found with the original sketches of these shirts is the finish of the front neck opening. Often it is suggested that the cut edges of the cloth be turned twice and stitched. I found this finish to be both skimpy and of poor quality. My pattern includes a facing piece for the front neck opening for a better quality finish. If you don’t favour a facing, a placket would work just as well.Sizing:
Fabric at 130cm (51″) will make a shirt that fits up to a women’s large. Fabric at 150cm will make a shirt that fits up to a mens extra large. This shirt should be worn as a very loose fit and would not be successful as a tight fit. I’d easily recommend garment ease of at least 20-30 cm on your chest measurement.Fabric:
My first sample was made in a light cotton poplin and I found that not drapey enough to make a good shirt. I was looking for a soft, clingy effect in the fabric. I think the original shirts would have been made from fine silks. For the next sample I’ll probably try a fine woven rayon as I’m not the biggest fan of silk. There are some top quality fine woven cottons made by the Japanese that would also be fabulous for this design.Use the comments section below to let me know if you’ve tried to make this historic piece of clothing. I also have a private Facebook group called STUDIO FARO MAKERS where you can leave your comments and photos and have pattern making conversations with the group.
Take this moment to sign up for my fabulous newsletter! Every month or so I send an email newsletter with new website content and always, always an enormous discount code for all my sewing patterns, garment blocks and pattern making instructions.
This discount code is for subscribers only. Don't miss out!
Anne Casey
Posted at 00:50h, 25 JulyI have made them years ago for reenactment participants.
While I used a sewing machine – no-one paid me enough to do it by hand – it may well be that sewing in the gussets is much easier by hand.
Janet Arnold has some good patterns, if you aren’t familiar with her books.
Studio Faro
Posted at 10:49h, 26 JulyHI Anne, I agree making them by hand would be a labour of love. Especially if you added the embroidery factor. I really like the oversized blouson effect of these shirts. A little on-trend at the moment. I have heard of Janet Arnold but never looked at her patterns. I’m off to google her and see what she has to offer. 🙂