16 Apr Issey Miyake Single Twist
Posted at 11:27h
in Pattern Making, Pattern Making Instructions, Pattern Puzzles, Stretch Patterns, Womens Knit Block
0 Comments
Does anyone remember this little pattern puzzle from last year? It’s been a long time waiting in the wings for posting. An innovation on an existing theme, this single twist is ingenious in that a cowl is built as part of the twist pattern. The final effect being a more subtle twist with a relaxed fit. If you’d like to learn my method for creating Twist Drape Patterns I have a detailed worksheet for making Jersey Twist Patterns. For just a few dollars you’ll get the same training you’d get if you came to the workshop in my studio. My Knit Block is also available as a PDF download.

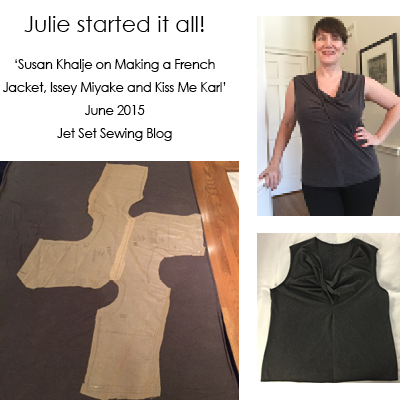
Julie started it all – Issey Miyake and other favourites.
Most definitely not my idea but bought to my attention by Julie of jet Set Sewing. Here she is below with the only existing photo of this very special pattern. Intrigued by the weird shape I was determined to work out how that genius Issey Miyake made this pattern. The other thing I like about this top is you get the twist without revealing too much décolletage. Always a win!
Most definitely not my idea but bought to my attention by Julie of jet Set Sewing. Here she is below with the only existing photo of this very special pattern. Intrigued by the weird shape I was determined to work out how that genius Issey Miyake made this pattern. The other thing I like about this top is you get the twist without revealing too much décolletage. Always a win!
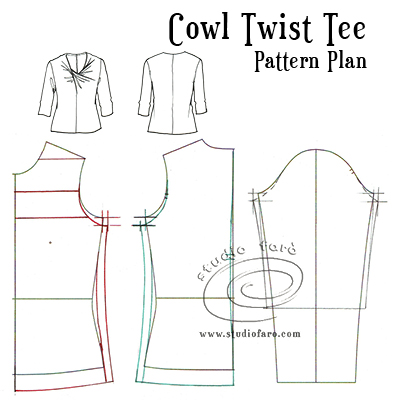
To make this pattern you’ll need my knit block or a pattern for a basic women’s tee:
- Trace out my knit block as a half front beside a half back and sleeve.
- Add length to your block: 5-6cm (2-2 ⅜”) past the hipline for your top.
- Loosen the fit of the body of the block by dropping and extending the underarm point by 2cm (⅝”) in each direction. If your tee shirt pattern is already a loose fit this adjustment will not be necessary.
- Re-draw your front and back side seam with a more relaxed fit through the waist.
- Make corresponding changes to the underarm point of the sleeve: drop and extend the underarm point by 2cm (⅝”) in each direction. Again, if your tee shirt pattern is already a loose fit this alteration will not be necessary.
- Re-draw the sleeve seams, shaping from the new underarm point through to a three-quarter length sleeve with a looser fit.
- Create shape on the CB seam by 1cm (⅜”) at the waist line: shaping back to the hipline and mid back area. This shaping resembles a half dart shape on the centre back seam.
- Mark in the cut lines for the front cowl, above the underarm point, up to the neckline area.
To make your pattern pieces:
- Cut the cowl lines in the front block and open up until the front neck point meets the back neck point.
- The front block with cowl is placed at a right angle (90 degree) to the back block.
- Cut two of this new pattern shape to make the final pattern piece.

For the final pattern:
- Join the two identical pattern pieces together along the centre front cowl line as the diagram below.
- In this example I’ve placed the grain line, using the back pattern as the guide. I’m not certain this is the best location until I make the first sample, however it’s probably the best fit on most fabrics.
- Copy the three-quarter sleeve and add a grain line.
- Cut a bind piece for the front and back neck. Until I make the sample I’ll not be sure if a bind finish is the best option for the neckline.

The best fabric for this job would be a two-way stretch knit that’s good both sides. However it may also work on some one-way stretch fabrics. Only testing will reveal the best option.
Let me know if you have any questions about making this pattern. I’m always happy to help.
If you’d like to buy a copy of these pattern making notes for your own personal use at home you’ll find them here: Issey Miyake Single Twist – Pattern Making Instructions. 🙂
No Comments