17 Aug Testing the Twist Tee
Posted at 10:00h
in Garment Construction, Pattern Puzzles, Stretch Patterns, Womens Knit Block
0 Comments
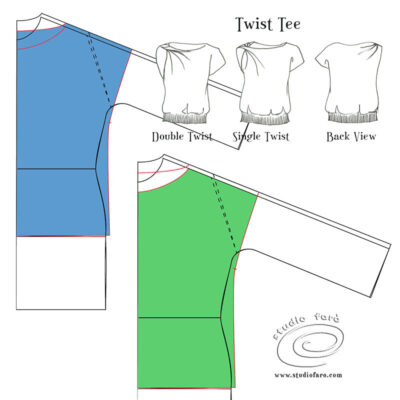
The Twist Tee pattern puzzle was always one of the easiest versions of jersey twist patterns I’ve ever produced. You don’t even need your own garment blocks to make this pattern. Any simple top or tee shirt shape pattern is a good place to start for this project. The sample I have posted here is the double twist version. It’s possible to make this as a single twist pattern from the original post if you have access to the appropriate fabric.
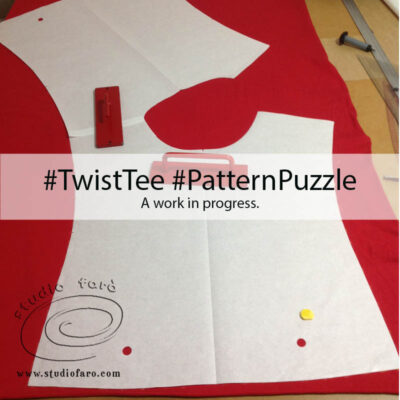
Since my original Twist Tee Pattern Puzzle post I’ve had a moment to update the graphics for these instructions. Hopefully the clearer graphics will make the pattern making easier. You’re looking to start with a simple shape top or tee pattern that doesn’t have a separate sleeve. Trace a copy of a full front pattern and a full back pattern to start your pattern making.
Join these pattern pieces together at one shoulder seam only, leaving a small gap of 1cm (3/8″) between each piece. This extra centimetre is there to account for the loss of fabric length in the twist. This is now your pattern shape without seam allowances. Add the seam allowances you prefer for your own sewing style.
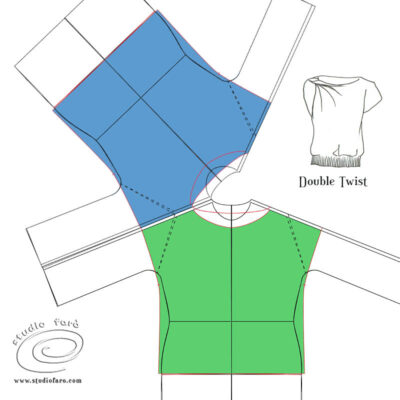
I think a seam allowance of 1cm (3/8″) on the side seams, armhole, hemline and shoulder seam. If you’re binding the neckline then a 7mm (1/4″) seam allowance will work well. To finish the pattern you’ll need a binding pattern for the neckline and a hip band pattern for the hem finish. The hip band should be at least 10cm (4″) smaller than the hemline you’re sewing it too. Perhaps more if you use a ribbed knit fabric.
The order of construction is as follows:
- Finish the neckline with a matching fabric binding for an inside or outside bind. Stretch the binding onto the neckline to prevent stretching the fabric that will make the neckline gape.
- Turn the 1cm (3/8″) hem finish on the armholes and machine in place.
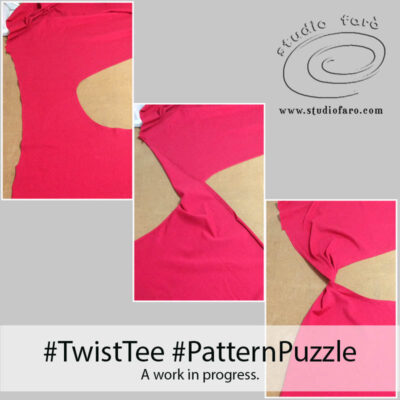
- Twist the front part of the tee twice before sewing up the shoulder seam.
- Stitch the both side seams together before adding the hip band.
- Join the hip band in a circle and press it in half and attach to the hem of the tee.
- Stretch the smaller piece of cloth of the hip band onto the larger piece as you’re sewing, to evenly distribute the ease.
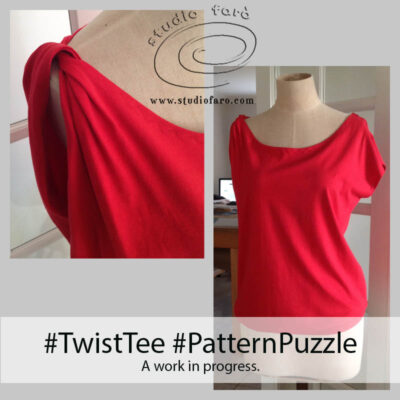
So after all of that I’ve had to go back to the drawing board because I didn’t confirm the fit of my basic shape before making the drape pattern. I need to close up the neckline so it’s not so loose and exposed. The principle works but the base was a little oversized.
Let me know your thoughts or questions about this pattern in the comments section below. If you fancy hearing about new product and discount codes, sign-up below for my newsletter direct into your inbox. 🙂
Take this moment to sign up for my fabulous newsletter! Every month or so I send an email newsletter with new website content and always, always an enormous discount code for all my sewing patterns, garment blocks and pattern making instructions.
This discount code is for subscribers only. Don't miss out!
No Comments