10 Nov The Cowl Tube Top
Posted at 10:17h
in Pattern Making Instructions, Pattern Puzzles, Self-draft, Vintage Patterns
0 Comments
It’s a mean thing to present the fans with a rectangle as a #PatternPuzzle and expect them to describe the garment. In my defence, I did include a couple of very small notches as a clue. In the end, Mioara was able to produce an almost exact image of the idea in knit fabric. I think we may have been reading the same pattern making books. 🙂 I found this image on Pinterest, but have had no luck finding the original source material. If anyone knows the origin of this piece I would love to be able to include the correct information here.
Addendum: ‘Catdoesit’ has found the reference for us:
‘That page is from a Portuguese sewing book, from the series ‘curso de corte e costura Gil Brandao.’ ‘…but I don’t have any proper reference as it is ancient.’
So I had a look and found the exact reference to the Cowl Tube Top.
Page 33 of the print book and page 29 on the pdf.
http://www.scribd.com/doc/78084241/25-Modelos-de-Blusas-e-Blusoes-Gil-Brandao
Page 33 of the print book and page 29 on the pdf.
http://www.scribd.com/doc/78084241/25-Modelos-de-Blusas-e-Blusoes-Gil-Brandao
There are so many ideas out there that turn a simple rectangle into an elegant garment. Rhonda’s Creative Life has a regular series of rectangle pattern projects. There are also a couple of rectangle puzzles in this blog: The Retro Shrug & The Japan Skirt
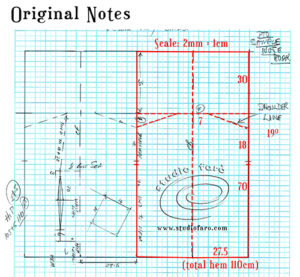
I do love a bit of graph paper when trying to scale up new patterns. The Scale I have worked with here is 2mm:1cm. To draft this rectangle you need the following measurements:
- Tunic length from High Neck Point – 70cm
- Bust or Hip Measurement plus ease – use the biggest of the two measurements – 100 + 10 = 110cm
- Allowance for the Cowl Neck above the shoulder line – 30cm
Drafting the basic Rectangle
From the centre line:
- Mark tunic length of 70cm and a cowl depth of 30cm (total 100cm).
- At a right angle to the centre line mark out quarter hip/bust measurement (plus ease) to complete your drafting rectangle.
- At the 70 cm line mark a right angle across the rectangle as neck level.
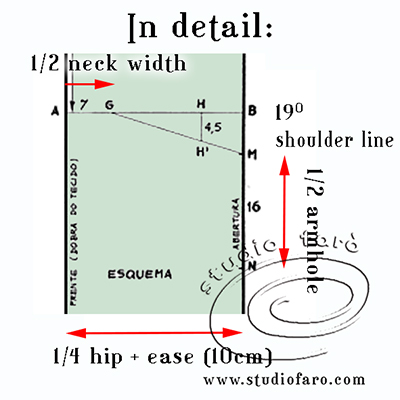
- Mark out 7cm from the centre for half neck width.
- Angle the shoulder line from this point toward the side edge at a 19 degree angle.
- Measure down from this point for half the armhole measurement. This graphic suggests 16cm but I know I will need more than 32cm to have a comfortable fit in the armhole. In my own draft I used 18cm (36cm).
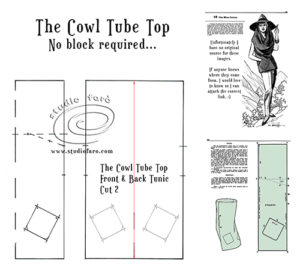
Trace out the full pattern, marking the pocket positions for the front and armhole notches on both seams. Cut two of the large rectangle and two pocket pieces to complete the garment.
For future investigations, I have unearthed two US patents from the mid 1950’s, that are based on a similar concept with small structural differences. I call them The Trio of Tube Tops. Watch this space for more.
Please leave your questions in the comments section below. I love to hear from you.
Enjoy 🙂
No Comments