15 Jan Three Colour Wrap Dress
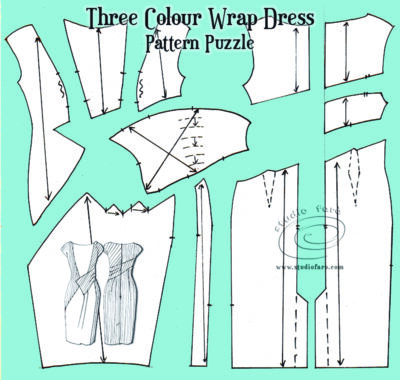
Originally posted in June 2013, it was quite a challenge for my Facebook fans to solve this Pattern Puzzle. This is the original puzzle, the sketch and pattern plan are pasted below with all the pattern making detail. I have updated the graphics and the instruction in line with more recent pattern puzzles.
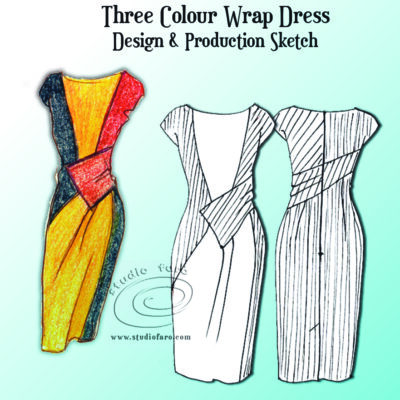
The original design was scanned from my Visual Diary (below) and turned it into a production sketch ready for the pattern making process. The dress is sketched up in three blocked colours of Navy, Red and Yellow. Working through the production sketch will always help you finalise all the design details, including how you might get into the dress. In working the design idea through to the back of the dress, I’ve continued the waist detail around at an angle, to ensure design continuity for the entire dress.
The pattern development below is based on my fitted dress block available here (Women’s Fitted Dress Block) for you to download. In the Pattern Plan I have decided that the red diagonal panel at the waist, with the drape, should be in one piece (no side seam) so the tucks can be secured softly at the side seam, as in the original sketch.
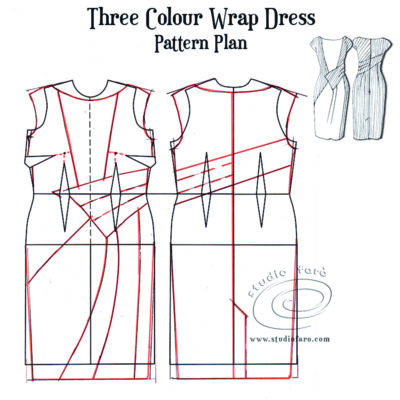
The original dress design is asymmetric in nature, so you’ll need to trace out a full front and back dress block to work all the design detail effectively. The main features of the Pattern Plan are:
- There is a boat neckline that starts at the mid-shoulder point and sits 1-2cm below the block neckline.
- Extend the shoulder line to create a cap sleeve that just covers the shoulder. The extension past the shoulder point is by 4-5cm (1⅝”-2″), and shaped it slightly to follow the line of the shoulder joint.
- The underarm point on the front and back block should be lowered by 1-2cm (⅜-¾”). Join the new shoulder line with the new underarm point.
- For the body of the garment, start the planning of the design lines with the waist, sash-like detail. Start on the right-side of the back of the garment, around the underarm point, and work diagonally across the back, towards the waist area. On the front right-side, start at the same level as the back left-side and work diagonally towards the centre waist.
- Split the waist sash-like detail into thirds as the location for tucks around the waist.
- Draw in the upper bodice panel lines on the front dress. Continue the front panel through to the side seam, off the sash, to build the navy colour block detail.
- For the overall dress length i have decided to add 5cm (2″) below the knee level on the dress block.
- Taper the side seams of the front and back dress (2.5cm (1″) each side) at the hemline level. Draw a line from the original hip level, through to the tapered position at the hemline.
- Draw in the skirt panel seam on the right side of the front dress, through to the hemline.
- Then mark in the drape lines, in the lower front skirt, to create tucks angled from the centre waist through to the left side of the dress.
- In this dress I have decided to use the centre back seam for the zipper. To compensate for tapering the side seams, I will add a centre back walking vent at the hemline.
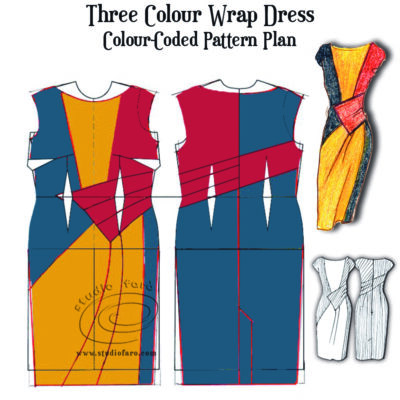
In the diagram above, I’ve colour coded each of the parts of the pattern to make it clear where the seams are and how this garment comes together. Each of the coloured areas is a separate pattern piece, with the exception of the draped waist detail that is a composite of the back the front pieces that wrap around the waist.
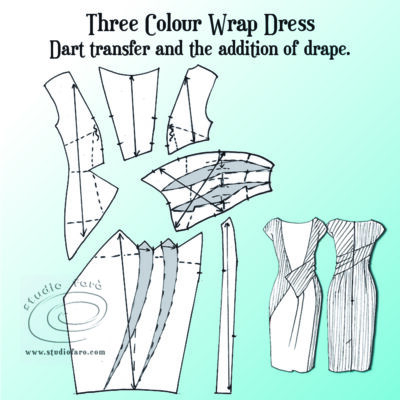
Where you have bust and waist darts, fold them out into the seam detail so you retain all the original fit of the dress block. The draped waist detail uses both the darts and some extra fabric to create the soft tucked drape at the left side. And the front skirt area is also opened up to include extra fabric for the two soft tucks of drape that come out of the detail.
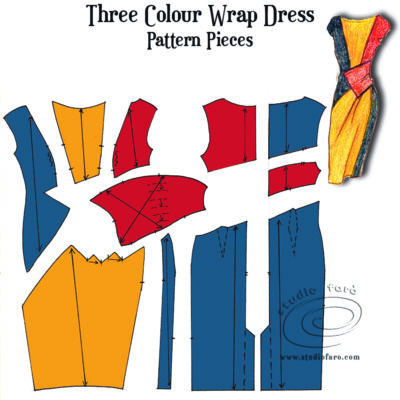
The above diagram is how the fabric (pattern) pieces would look cut out in the three different colours. Do be aware that the change on each pattern piece according to how they need to behave. Let me know if you have any questions about this design and pattern making instructions, please feel free to leave a comment below. If you’d like to buy a copy of these pattern making notes for your own personal use at home you’ll find them here: Three Colour Wrap Dress – Pattern Making Instructions.
Katie Lucas-Wren
Posted at 13:57h, 03 FebruaryI love this. First right in without me having to figure out where to put the color blocks. I am into designing my own wardrobe with upcycled fabric and color blocks. exactly what I have been looking for! Thank you!!!
Studio Faro
Posted at 10:56h, 04 FebruaryHi Katie
I’m so pleased you like this pattern. I can hardly wait to see your final sample especially with recycle fabric. I have spent the last three years without buying new fabric and hope to continue. There’s so much second life fabric in op shops I’m spoilt for choice.
If you’d like to share a photo I have a private Facebook group you can join. It’s called STUDIOFARO MAKERS. 😊