16 Mar Vintage Fancy
Posted at 14:07h
in Fitted Dress Block, Pattern Making Instructions, Pattern Puzzles, Vintage Patterns
0 Comments
Since the earliest of my pattern making days I have had a passion for the tailored femininity of vintage styling. And now that I have discovered an extensive online community that enjoys both fashion and vintage designs I am presented with so many beautiful options for our weekly pattern puzzle. I found this weeks inspiring image in a wonderful tumblr blog, The Tailors Desire, full of all things vintage. 🙂
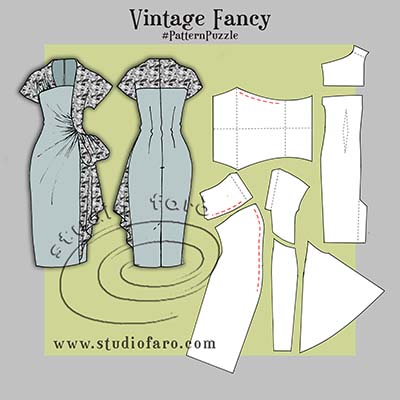
This design has a most distracting and flattering use of Contrast in an interesting asymmetric design. Part of the magazine description included:
‘The squared neckline and dramatic hip fancy will make you ever so feminine.’
Assuming we are working with woven fabric, without any stretch, I have chosen my women’s fitted dress block to base the fit of the new design. The front has the asymmetric detail so a tracing of the full front block will be needed. The back however is symmetrical and needs only half back to develop the pattern.
- Begin by building a grown-on neckline for the front and back.
- Extend the shoulder line, front and back, into a grown-on cap sleeve style.
- Drop the underarm point for comfort and curve the side seam into the lower edge of the cap sleeve.
- Lengthen the dress block to just below the knee and taper the side seams toward the hem.
- Mark in the back yoke line and consider transferring the shoulder dart into the yoke seam.
- Shape the back waist on the CB line by 1 cm.
- On the front draft mark in the neckline, yoke seam and the vertical panel seam through the dress.
- Note that I have moved the right side darts a little to fit in with the new panel line position.
- Curve the lower edge of the front side body panel from princess panel to side seam.
- This seam will hold the waterfall feature and the hip fancy.
- Extend the line for the waterfall pattern making sure the leading edge is shorter than the seam edge.
- Mark position and size of the hip fancy to give you a guide for the patterns final dimensions.
- Now mark in the cut lines through the front dress to include extra fabric for the gathered drape.
- Mark cut lines into the front right yoke to include extra fabric for the gathered drape.

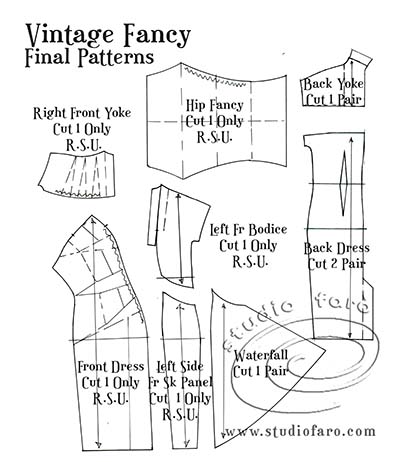
Trace off all the separate pattern pieces. Please note that :
- All front pattern pieces are single cut R.S.U. (right side up for fabric)
- The exception is the waterfall pattern piece that may be cut double or single depending on your fabric choice. As a single cut it would also be R.S.U.
- The back pattern pieces are both cut in pairs for the symmetric styling.
- The front neckline, on the yoke patterns, has a turn back facing included in the pattern piece. As does the back neck on the yoke pattern.
- It is possible to treat the front neckline on the dress panel in the same way – with a turn back facing. However it may be more stable if a separate facing is used.
This was such a delightful pattern to work out and I hope to see many of you giving it a go. Let me know if you have any questions in the comments section below. I’m always happy to help. If you’d like to buy a copy of these pattern making notes for your own personal use at home you’ll find them here: Vintage Fancy – Pattern Making Instructions 🙂
No Comments