27 Apr Vintage Update
Posted at 16:40h
in Fitted Dress Block, Pattern Making Instructions, Pattern Puzzles, Vintage Patterns
0 Comments
The vintage inspiration for this weeks #PatternPuzzle has come from a pattern I found on the So Vintage Patterns website. Unfortunately, this particular one has been sold but they have a mountain of great vintage patterns for all eras. I was attracted by the asymmetrically-set, diagonal seams with gathered drape. But not so much the button decoration. By adding the extra seams I believe I have made it easier to construct as they eliminate the corner seams. I have also reworked the back view from the original design to carry the front diagonal seams through to the back dress.

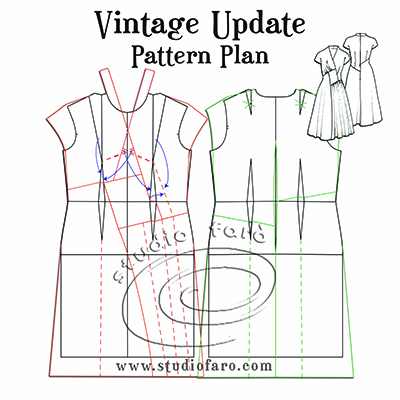
Starting with my fitted dress block, or your favourite basic dress pattern, trace out a full front and back block to workout this asymmetric design:
- Extend the shoulder line to make a cap sleeve extension on the front and back bodice. Eliminate the back shoulder dart.
- Mark in the position of the main diagonal seams on the front bodice, above and below the waistline.
- Connect these seams through to the back dress ending on the shaped centre back seam.
- Add an ‘A’ Line flare to the front and back skirts, from the hip to the hemline.
- Add a grown-on collar to the front bodice approx. 3.5-4cm wide. The length of this collar is equal to half the back neckline measurement.
- Extend the front edge of the collar into the front wrap line to finish on the first diagonal bodice seam. There is a wrap over of approx. 10cm on that seam.
- Connect the front vertical seam from under the bust to the hemline.
- Mark in the dashed lines on the skirt patterns to indicate where the extra fabric will be added for gather and flare.
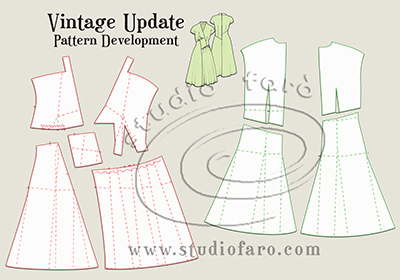
For the front bodice pieces, close and transfer the darts to the under-bust area. The right side of the bodice is gathered back and the left side has a single dart. You will notice I have slightly altered the dart position between the sketch and the pattern to ideally improve the making.
For the skirt patterns, fold out the waist dart to create flare in the hemline for the front right skirt and both back skirt patterns. Then add some extra flare on to the side seams to achieve your desired hemline circumference. The front left skirt pattern is a little different in that it has gathers where it joins the diagonal seam. Cut this pattern open and add fullness to the hem and the gathered seam. For this vintage design, I would imagine that a total of 200-250 cm. in the hemline would be wonderful.
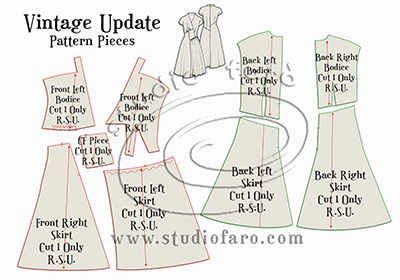
The main pattern pieces are set out below with grainlines and cutting instructions. To finish the collar and neckline a full facing is required and for the cap sleeves, a bound edge or narrow hem is also ok. Or alternatively add a full lining to the front and back bodice, remembering to add fusible interlining to the collar and front neckline of the lining piece.
I hope you’ve all enjoyed the puzzle and the instructions in this post. Please do not hesitate to ask any questions you have in the comments section below. If you’d like to buy a copy of these pattern making notes for your own personal use at home you’ll find them here: Vintage Update – Pattern Making Instructions Enjoy 🙂
No Comments