09 Jun CJ Drape Skirt
This weeks #PatternPuzzle is not an exact copy of the Charles James Skirt but a very do-able pattern for a 101 approach to understanding darts to drape in flat pattern making. No really, that’s what I used to call the workshop; so formal and so academic. :] This Charles James skirt has so many complex panels that it started to send me a little crazy, so the decision was made to modify and simplify. You’ll find a video of pattern making instructions on my Youtube channel.
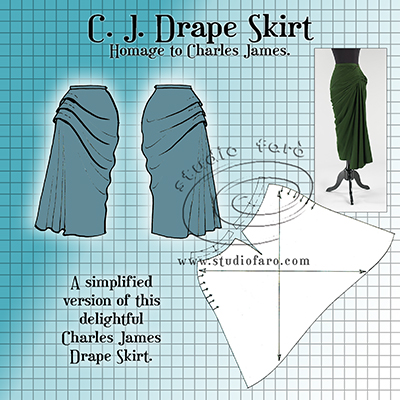
In this style I have worked to the natural waistline (quite high by our current fashion standards) as it suits the style and fit of the Charles James model. Using my skirt block or your favourite pencil skirt pattern, trace out a full front and back shape for this asymmetric pattern:
- Extend the skirt length past the knee for up to 15-20cm to reach the mid-calf.
- Taper all four side seams to achieve a close-fit effect in the hang of this skirt around the seat and the thighs.
- Plan the direction and location of your drape tucks. In this case I have located 4 tucks on the upper left side seam and marked in the direction of the tucks toward the hip and upper thigh on the right side seam. (Note in the final pattern I have adjusted this to three tucks to work better with the fabric allowance.)
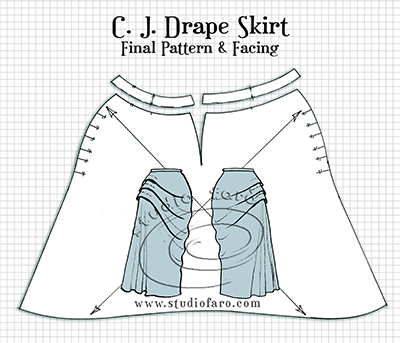
- I have altered the front and back darts slightly to connect them to the drape lines that make the hip tucks. This will ensure all the dart fitting in the skirt is transferred to the drape feature.

- Cut along the drape lines, fold out the waist darts and open each section to include enough fabric for each of the tucks.
- In addition to the drape from the darts, the other sections have been opened approx. 5-6cm
- Please note that in this early pattern development there is an unevenness in the amount of drape from the darts and the extra drape openings. In the final pattern, all of this extra fabric will be divided equally between only three hip tucks. I think you may find there is not quite enough fabric to make four decent tucks.
- Finally, swingout both left side seams (lift to a 30-40º angle) to make the fishtail drape in the left side seam of the skirt.

- For the final pattern, divide all the extra fabric on the left side seam into three even tucks. Place them in the same location but set them out at equal positions and intervals.
- You have a choice of tracing off a waist facing for this skirt or drafting a strap waistband, as in the original sketch.
- The tricky part of this pattern is the dart-like opening on the right side seam. Depending on your skill level you may be able to include a zip in the right side dart. If necessary you can open the pattern a little to give yourself more space for inserting the zipper. Or alternatively, include a placket for both sides of the opening for a different style of fastening (buttons).
- After all, it’s not absolutely necessary for this skirt to be a one-piece pattern. A seam on the right side of the skirt will not compromise the style or fit in any way.
- Add bias grain lines to the skirt and a block fusing instruction to the facing or waistband.
- I suggest the construction order for the left side seam will be: sew the seam first and sew the tucks in place afterwards. If you sew the tucks first then the seam, you will squash the drape feature flat into the seam and lose the profile of the drape.
Wishing you all the best with this new pattern. If possible, please make sure the block or pattern you start with has already been altered to suit your own figure type. This is how you get the best results in pattern making, by knowing that you can rely on the block you are using. If you’d like to buy a copy of these pattern making notes for your own personal use at home you’ll find them here: CJ Drape Skirt- Pattern Making Instructions.
Let me know if you have any questions. Always happy to help. 🙂
No Comments