20 Oct Classic Drape Dress
The idea behind this weeks #PatternPuzzle is to use a classic drape style to show how the fitting darts in my dress block turn into drape according to design. And to also have a go at making my pattern making technique as clear as I can.

Starting with my women’s fitted dress block (you can substitute a fitted dress/shirt pattern), plan the position of the fitting panels and then the drape position and direction from those panels. This style is asymmetric so a copy of the full front is needed to make this pattern.
Note the following points:
- The tapering for hem of the dress is not marked on the side seams but marked in below the front and back waist darts.
- The shoulder line has been extended to achieve a dropped shoulder look in the dress.
- The corresponding adjustment is made to the sleeve head and underarm point.
- Both the front and back waist darts have been moved to suit the position of the panel darts in the production sketch.
- The gape dart on the back neckline will account for the back shoulder dart shaping and help control the wide neckline.
- On the front fitted block the fitting darts, gape darts and hem tapering are coloured green to indicate what shape will be transferred to the drape tucks in the next stage of the pattern development.
- The sleeve length is set just above the elbow and a little tapered. It’s becoming a bit of a favourite for me at the moment. 🙂
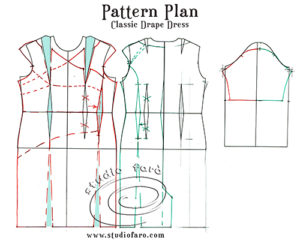
- The diagram below (on the left) is the first stage of dart transfer that moves all darts and shaping to the tuck positions on the front panel dart (left side). The bodice and skirt have been separated to make this first stage possible.
- In the diagram on the right, the second stage of development is to add extra drape to balance the three tucks needed in this design. The pink area is the extra drape added to complete the tucks.
- Note that the waist tuck is all additional drape (pink).
- Join the two pattern pieces at the waist, on the right side of the pattern, and open required amount for the tuck in the left side panel dart.

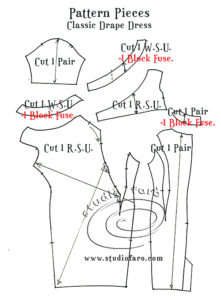
Below you will find a complete set of pattern pieces for this design. Please note the cutting instructions (R.S.U. & W.S.U.) for the front facing pieces. The grain on the front dress is bias to achieve the best drape through the large tucks. The back dress may be cut on the straight or bias grain according to the fabric you select.
I would love to hear what you all think about this classic style. Feel free to leave all comments and questions below. If you’d like to buy a copy of these pattern making notes for your own personal use at home you’ll find them here: Classic Drape Dress – Pattern Making Instructions.
Enjoy 🙂
No Comments