02 Dec Dior Draped Skirt
Posted at 17:16h
in Pattern Making Instructions, Pattern Puzzles, Vintage Patterns, Womens Skirt Block
2 Comments
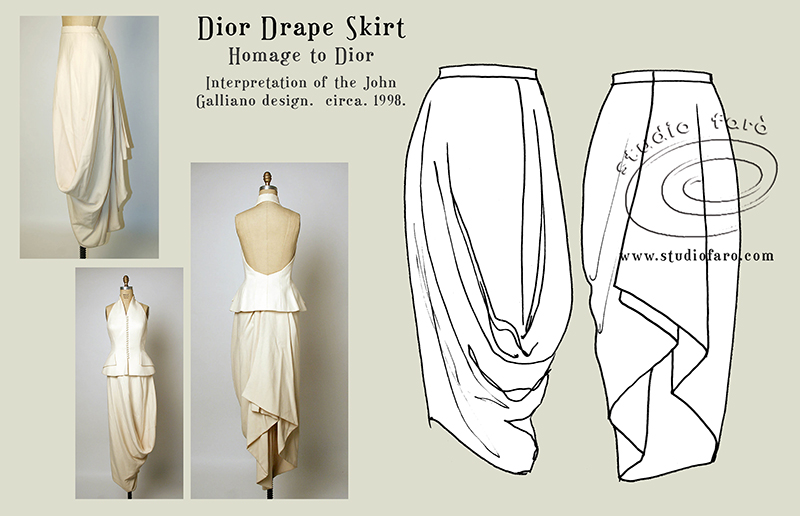
This treasure was discovered in the archives of The Metropolitan Museum along with thousands of other beautiful pieces. Much to my surprise, I discovered that it is a fairly recent design by John Galliano for The House of Dior in 1998.
For this puzzle, the focus is on the skirt and not the tailored halter neck top. The combination of the well-organised waterfall drape at the back of the skirt and the cowl drape in the front of the skirt was fascinating to me.
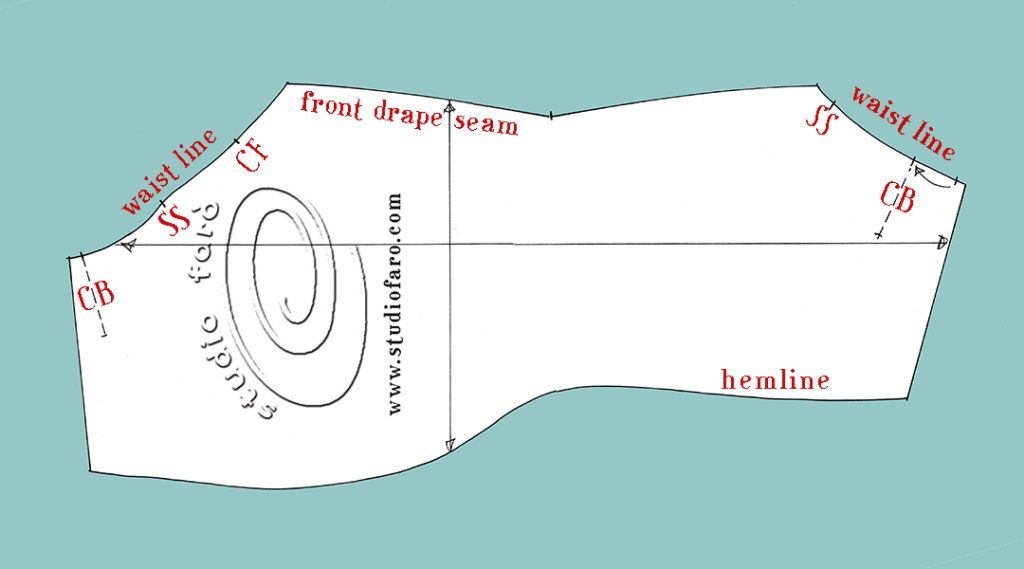
The pattern shape below was posted on our facebook page early Saturday morning. Fans took their time working out the detail and came back with all the answers on Saturday. Thanks to Jennifer, Julie, Toni and Mioara for showing such amazing stamina. I’ve added some notations (the CF/CB and side seam (SS) markings) to the puzzle shape so it makes more sense.
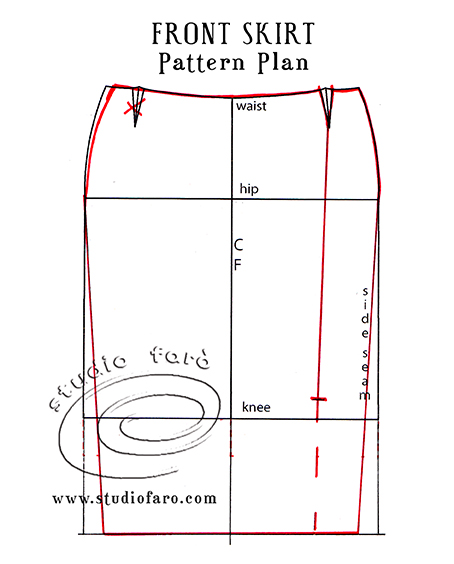
Using your personal fit basic skirt block, begin with the front skirt pattern adaptations, connect the end of the left side dart to the hemline in the position of the front drape seam. Mark the end of the seam without running all the way to the hem. The area below this mark is where the extra fabric and drape will be included. You can get the instructions to drafting your own Skirt Block and Pencil Skirt on our website. You can also follow the same instructions watching a video you’ll find on my Youtube channel.
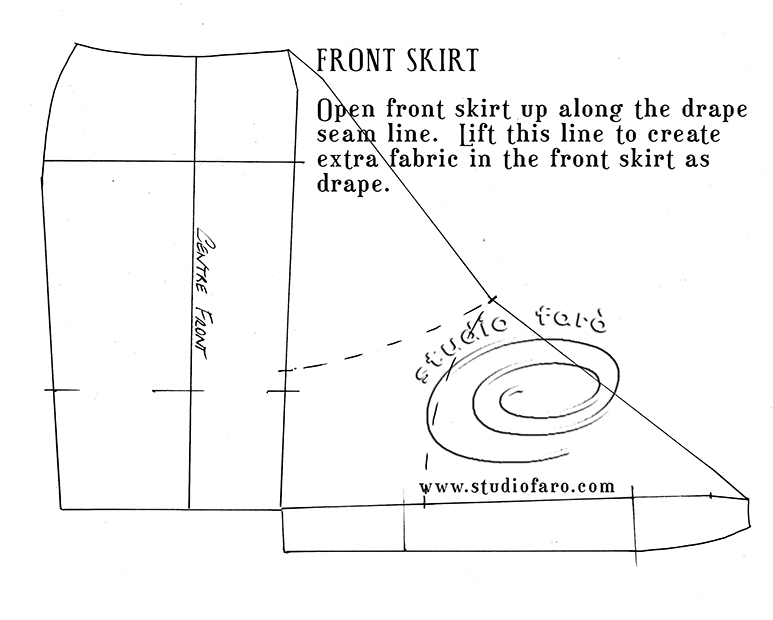
Trace the right side section of the front skirt. Then swing the front drape seam line up to approx. 45 degree angle. Do the same to the left side section for the front skirt then connect it back to the right side skirt at the hem. Although this shape looks awkward on the hemline, all will be resolved in the final pattern.
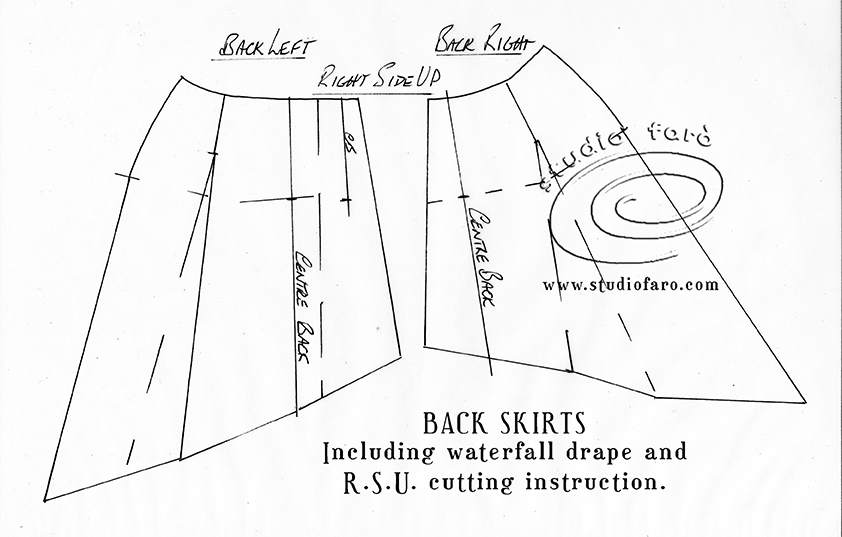
The back skirt Pattern Plan sketched out below details the waterfall for both the back right and left skirt patterns. Back waist darts will be closed and transferred through to the hemline. The CB opening will be hidden under the last folds of the waterfall, along the CB line as marked in the final pattern. Making these back patterns is a matter of following the lines on the pattern plan and tracing for each fold and dart transfer. Also important to mark R.S.U. on your pattern pieces as soon as you make them.

The back skirt pattern pieces below are faced right side up (R.S.U). They show the dart transfer through to the hemline and the fold back near the CB opening.
And finally all the pattern pieces are bought together to make one pattern piece for this skirt. I have sketched in the markings from the original skirt block to help with your reading of this pattern. At this stage the main concern is getting the pattern shape to make sense by cleaning up the outside edges – in particular, the corner in the front hem.
Please note the overlap of the hip curves at both side seams – this is a risky move but I am hoping the extra fabric from the front drape plus bias cutting over the side seams may allow me to get away with it. I have planned the placement of the grainline so that I get the bias grain as close as possible to the side seam position. Then it’s all up to our first toile most likely cut from calico.

To complete this pattern for toiling (muslin) you will need to add a strap or contour waistband pattern. It il also be important to devise a simple but effective way to hide the CB opening under the waterfall drape at the back of the skirt along that CB line. I believe once you have the first calico toile on the machine the method will become clear. It is possible to consider this skirt with and without lining, depending on the season and your chosen fabric.
The choice of fabric for this style could be summer weight suiting wools ( fine weave), silk and silk blends with a medium weight, or a light to medium weight wool crepe.
You’ll find a video with pattern making details on my YouTube channel.
Please let me know if you have any questions. Always happy to respond to emails or comments on the post. If you’d like to buy a copy of these pattern making notes for your own personal use at home you’ll find them here: Dior Drape Skirt – Pattern Making Instructions.
Enjoy 🙂
NB: In the final ‘whole skirt pattern’ diagram, where the side seams overlaps, it may be a better fit if they overlap less. Then the top of the side seam area will result in a dart, which is very acceptable in this design.
Sara Glaxia
Posted at 20:32h, 14 Mayit would help greatly (for beginner as me) to share a short clip of how that spiral is actually twisting and when should one stop to twist (had not read the whole text but… I will, it so lovely of you to teach us such wonderful art! Thank you!
Studio Faro
Posted at 08:49h, 15 MayThanks Sara, I appreciate your comment. If you go to my YouTube account (@studiofaro) you’ll find a video of me making this pattern in small scale. You can ask any questions you have in the comments section. Thanks for dropping by. Anita