28 Sep First Sample – The Dolman Coat
Posted at 13:21h
in Fitting Patterns, Garment Construction, Pattern Puzzles, Stretch Patterns
0 Comments
This is where it all started: The Dolman Coat. Inspired by a Yamamoto garment: the pattern making instructions were developed for a loose fit kimono block. For this sample I have used a polar fleece and for winter that makes it seriously snuggles. ;). You’ll find a video of the pattern making process on my Youtube channel.
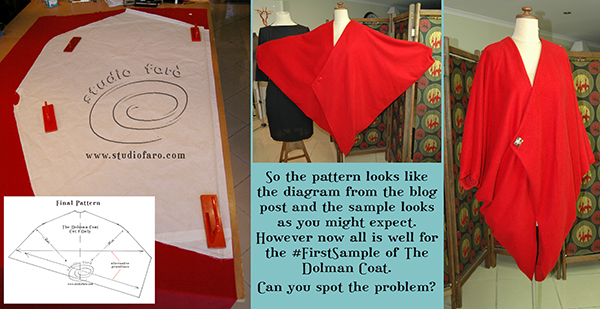
As with the majority of first samples, not everything goes entirely to plan.
But first let’s cover a few details I worked into the pattern as I was cutting:
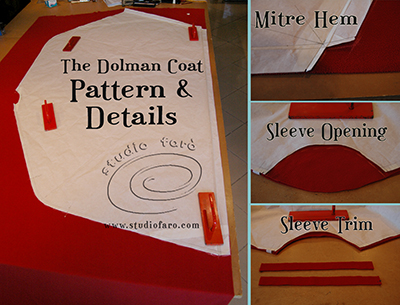
- I added a deep(4cm) hem to all the outer edges with the exception of the back neck where I added a 2cm inside bind. Notice the outside corner of the left side wrap (where I have added a button to the sample) has a mitre in the hem to reduce the bulk in the finished garment.
- After the first pin together fitting, I wasn’t that happy with the way the sleeve opening behaved so I decided to cut a semi-circle opening for comfort. I have also cut a 2cm inside bind (similar to the back neck finish) for each opening. The sample sleeve reaches to bracelet length which I have since found to be both comfortable and practical.
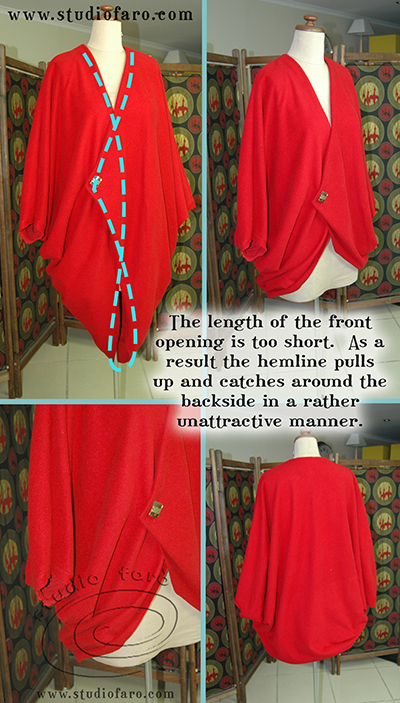
Back to the sample and the one major problem; not enough length in the outside edge of the coat. As a result when you put a real body in there the hemline pulls up to the top of the leg and the excess fabric gathers around the backside. Not such a great look!
From this first sample come two very different jobs:
- Firstly, how do we alter the pattern to fix the unsightly excess fabric and achieve the fit and drape of the original sketch?
- And secondly do we think we can save the toile? There’s nothing wrong with the ‘wearable toile’ as long as the effort doesn’t outweigh the reward.
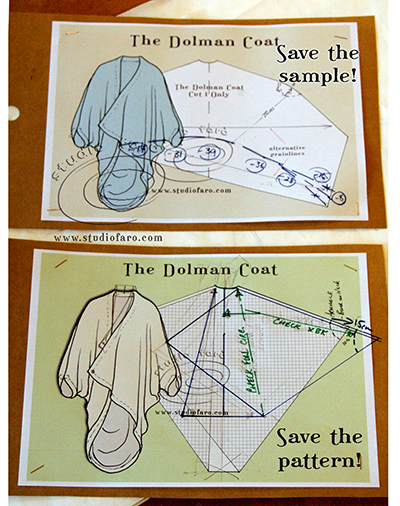
The changes to the pattern and the inevitable second toile will be covered in a future post. For the last part of this post I would like to share how I retrieved a very wearable garment out of this first sample. And I will be the first to admit to the large number of ‘wearable toiles’ in my wardrobe. 😉
The series of photos below show the alterations I made to the first sample to make it wearable. By shortening the length of the coat to mid thigh it has increased the hemline measurement enough to prevent it catching on my backside. If you go to the top diagram in the photo above you will get a rough idea of the amount of fabric removed. As a result the left side wrap is shorter and now sits higher on the chest in proportion with the new length.
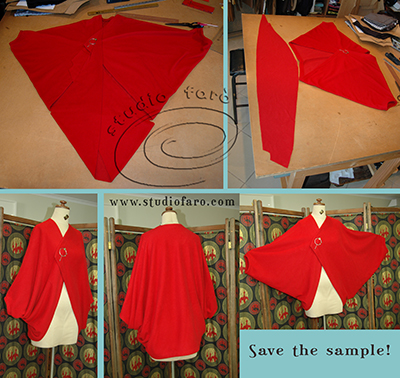
Although this sample has been sitting on my garment rail for over a year it only enjoyed it’s first outing on a recent trip to Canberra. The temperatures are always lower in Canberra and this wrap was fantastic in the early morning chill. And the new mid-thigh length is just perfect to wear while driving and the sleeve length doesn’t get in the way when I teaching. So thumbs up for the wearable toile!
In the second stage of sample development for this design I will be altering the pattern to try and arrive at a garment that looks more like the original sketch. This will also require a fresh look at the fabric most suited for this design.
Until then, enjoy and don’t hesitate to ask if you have any questions. If you’d like to buy a copy of these pattern making notes for your own personal use at home you’ll find them here: The Dolman Coat – Pattern Making Instructions. Enjoy 🙂
If you have any questions about this pattern or the sewing process, don’t hesitate to use the comments section below. 🙂 If you’d like to share your photos of this blouse you can join my Facebook group, or Instagram. To be sure I see the posts please use my handle @studiofaro or the hashtag #DolmanCoat.
No Comments