21 Jun Folk to Fashion – First Sample
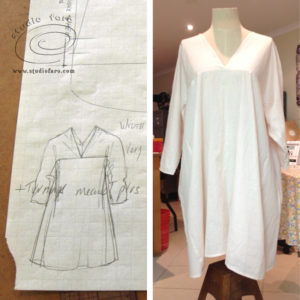
Trawling through the samples on my rail I see so many garments that I haven’t posted to follow on from the original pattern puzzle. So to re-cap I cut this first sample based on a folk costume pattern for a Mantle Dress, Inner Garment referred to as a Eura Costume. Like many folk costume designs it uses all the fabric and qualifies as zero-waste. It’s from a time when all textiles were considered of great value and no amount of cloth was ever wasted.
The diagram and measurements below are based on fabric 150 cm wide, including the selvedges. It makes a knee length tunic of generous fit. The most important measurements in this diagram are centre back to sleeve length, depending on whether you’re after a long or three-quarter sleeve. And the front length of the tunic from the yoke seam to the hem. These two measurements will determine the length of cloth you need to make your tunic. The sleeve opening is determined along the top edge of the cloth and the rest of the measurement are apportioned according tot he width of your cloth. You’ll find more information about these measurements in the original Pattern Puzzle blog post.
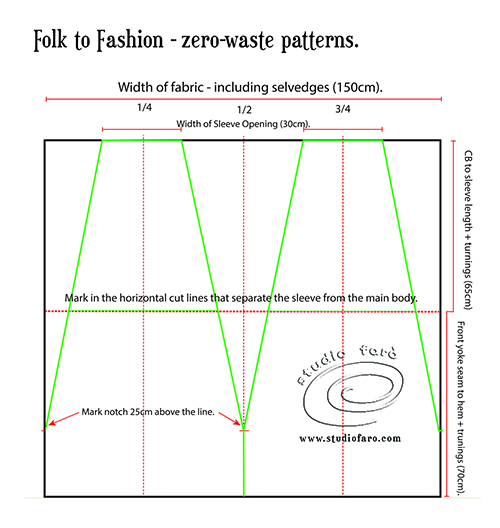
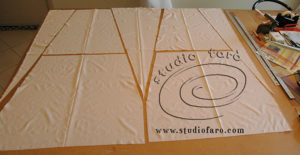
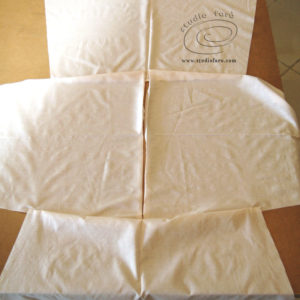
If you have a look at the cut cloth on the table below you’ll notice the sleeve pieces are at the top, the main tunic pieces are at the bottom and the long slim triangles are the side panels of the tunic that run all the way from the main hem to the sleeve opening. One of the triangle panels is a single piece (in the centre) and the other needs to be seamed together to make a complete panel for the other side of the garment.
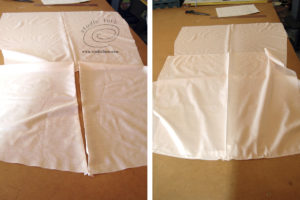
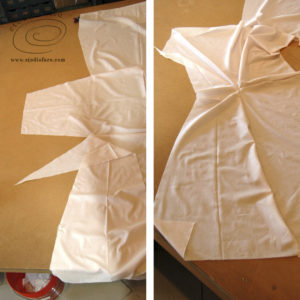
In the following construction pictures I’ve only pinned the garment together to demonstrate the order of construction. They’re definitely not the best photos I’ve ever taken but I hope they help everyone to understand how this tunic goes together.
The first step in the construction of this garment is to finish the neck line edges, at the top of the sleeve panel, by double turning and stitching to finish at 6mm (¼”). Then join these sleeve panels to the top of front tunic piece using a lap seam to cover the raw edge of the cloth.

If you have a look at the pictures below you’ll see how the front and back neckline is formed by the top edges of the sleeve panel. Now join the back tunic panel to the other side of the sleeve panel pieces using a lap seam to hide the raw edges of the cloth.
The garment as laid out below is the main body and sleeves of the tunic and all we need to finish the garment is to include the long, triangle side panels. First step is to sew the split triangle together. Fortunately the seam edges are the selvedge and don’t need any special finish. To keep the inside of the garment tidy I stitched the seam allowance flat to the panel.
The side panel pieces are sewn in from the main hemline through to the sleeve opening, on both sides of the garment. I suggest a lap seam that covers the raw edge of the cloth for all four of these seams. The pointy end of the panel ends at the sleeve hem and may be a little tricky to finish.
And finally for the sleeve and tunic hem, a double turn and stitch finish will leave the inside of the garment clean. This folk pattern makes a loose fit tunic that would work beside the pool or for those hot summer days when you simply can’t get cool enough.

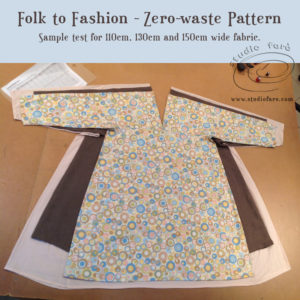
In the next post I’ll be trying this out on different width fabrics to see how much it changes the size of the tunic.
Let me know if you have any questions about this post, I’m always happy to help out. 🙂
Pingback:Eura Evolution | Empty Hanger Patterns
Posted at 21:21h, 08 May[…] is a good article about the history of the Eura dress (actually an underdress!). Studio Faro has played with this pattern a bit, as has Liz […]
Studio Faro
Posted at 16:15h, 09 MayThanks for the mention. 🙂 I love your different versions of this idea.