02 Feb Handkerchief Fold Dress
At last the detail for the Saturday #PatternPuzzle is here! My apologies for the delay to our usual posting but I had a little trouble with my graphics. It was a wonderful round of creative answers and clever solutions that finally solved this puzzle. Our Handkerchief Fold Dress is so named because it struck me that the construction of this dress is much like a handkerchief with the corners folded into the centre.

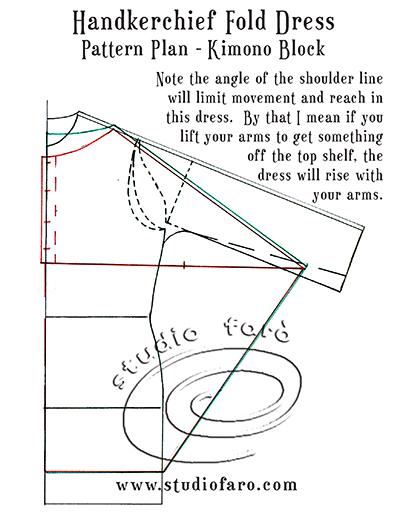
To begin I have used our loose-fit kimono block for woven fabric. If you don’t have this block or similar please don’t worry. As this style develops you will see the opportunity for self-draft in the simplicity of the pattern shape. Please note I am working the front and back patterns together. This loose-fit Kimono block shape is the same front and back except for the necklines and the position of the back shoulder line (1cm higher than front).
To begin:
- Determine the length of your dress/tunic and mark in the new hemline.
- Mark in your neckline shape from the shoulder line through to the CF (centre front) and CB (centre back).
- Select the depth of the front Empire seam and square from the CF line toward the sleeve area.
- The width of this part of the pattern can be determined by holding a tape measure the full width across your back from sleeve end to sleeve end. Here I have decided on a ¾ length sleeve and found 60cm across (120cm total) would be enough for comfortable movement.
- Mark back along this line for the sleeve opening. I believe this could be 20-25cm (total sleeve opening of 40-50cm). Only the first toile will tell us if this is too big or too small.
- Mark in the overarm lines for the front and back pieces. Please note the back sits minimum 1cm higher than the front.
- The final pattern development is the CF opening. I have chosen a button front in this design. Add 1.25cm/½” button stand to the CF line in the upper bodice only.
- Mark 5-6cm inside this line for the facing pattern. This will be a grown-on facing, all-in-one with the pattern. The finish for the neckline would be an inside bind finishing 6mm/¼”.
Unpack the pattern piece by tracing the back pattern first.
- Then add the upper front bodice to this pattern piece, joining it along the shoulder line.
- Now add the lower front dress to the back pattern piece along the side seam line.
- The shoulder and side seams are now a fold and not a sewn seam.
- The seams in this design will be on the CB line and through the front empire seam only. It is possible to have a CF seam if you are wanting to cut with less fabric waste.
- Finally add the front facing to the CF line on the upper bodice.
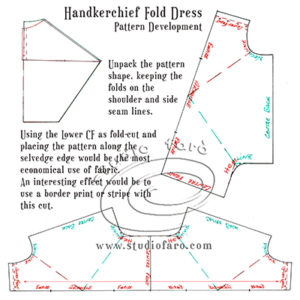
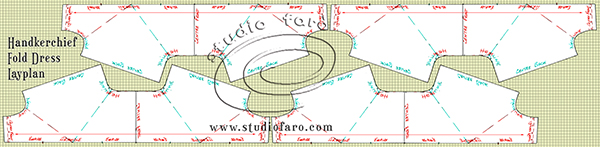
The cutting choice I have made above is to place the CF line, of the lower front dress, on the fold. This gives me a long thin pattern that I can place along the selvedge edge of the cloth. The width of this pattern piece is approx. 77-80cm. So it will be possible to achieve a certain amount of reduction in waste fabric by interlocking patterns along the length of the fabric (i.e.145cm usable width). On the fun side this cut would work well with a border print or stripe fabric.
Let me know if you have any questions in the comments section below. Always happy to help. If you’d like to buy a copy of these pattern making notes for your own personal use at home you’ll find them here: Handkerchief Fold Dress – Pattern Making Instructions. Enjoy 🙂
MAKERS
No Comments