23 Jul How to Shift a Bust Dart
These instructions will help you understand how to shift a side seam bust dart in your patterns or fitted dress block to suit your own bust point. First you will have to take a couple of measurements to know your bust point location. Please make sure you’re wearing a well-fitted bra. I cannot stress enough how important it is to have regular bra fittings, with a specialist, to make sure you do in fact have a good fitting. If the garment you’re making is for everyday wear, then the bra you wear when you take these measurements should be the bra you wear everyday. If however you’re making a special occasion dress then consider if the bra will be different or new. This is very much the case for brides. No measurements should be taken or calico toiles made until the bride has purchased her special day lingerie.
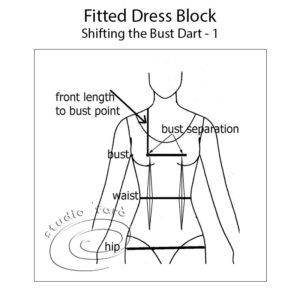
This first and most important step is to take the following measurements accurately:
1. Front Length to Bust Point – measure from your high neck point down to your bust level.
(HNP – high neck point is along the shoulder seam, closest to the neck column)
2. Bust Separation – measure between your bust points.
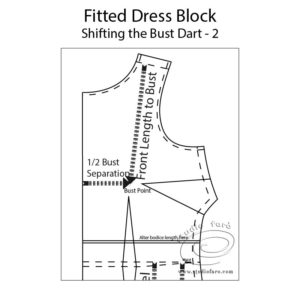
Then you’ll need to apply those measurements to your pattern to understand how far to move the bust dart. Measure straight down from the shoulder line of your pattern, toward the bust area, and mark in your bust level. At this level, measure from the centre front line half your bust separation. This exact position is your own personal bust point position.
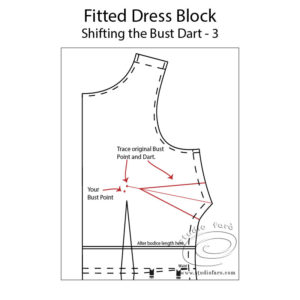
In order to move the bust dart on your pattern, you’ll need to find the original bust point of the pattern. You can do this by drawing a line through the middle of the bust dart and extend it 3cm (1 3/16″) toward the centre front. This will identify the original bust point of your pattern.
Now trace a copy of the original dart, including the centre line and original bust point.
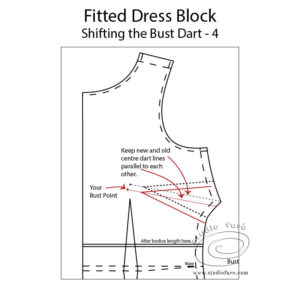
Using your copy of the traced dart, place it on the new bust point making sure you keep the centre line of the darts parallel. This will keep your dart at the same angle as the original dart and in keeping with the ideas of the designer and pattern maker of your sewing pattern.
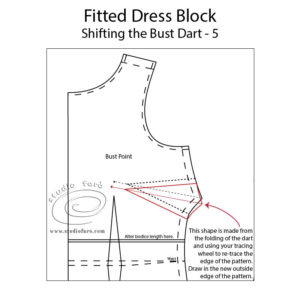
As you can see in the above diagram, this will leave your side seam in a bit of a mess. To clean up your side seam, you’ll need to fold the dart closed and re-draw the side seam, using your tracing wheel to mark the new line through the three layers of paper. Keep in mind that we use the centre line of the dart and bust point position to make this move accurately. When sewing your dart, the end point of the dart will always finish at least 3cm away from the actual bust point.
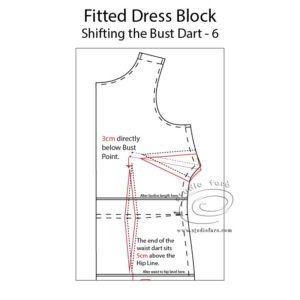
All the darts on the front of your pattern are located in relation to the bust point. So if you have moved your side seam bust dart to match your own personal bust point location, that will also affect the location of your waist dart. Shift your waist dart to be directly under the new bust point, making sure the centre line of the waist dart remains parallel to your centre front line.
The information above is suitable for moving the bust and waist darts in the front of dress and shirt patterns. If you have darts that are differently located or shaped you may have to adjust these instructions to suit your particular design. Feel free to ask your questions in the comments section below.
Take this moment to sign up for my fabulous newsletter! Every month or so I send an email newsletter with new website content and always, always an enormous discount code for all my sewing patterns, garment blocks and pattern making instructions.
This discount code is for subscribers only. Don't miss out!


No Comments