04 May Loose Fit Shirt
This week I’ve showcased #PatternInsights, where I share the light bulb moments in my pattern making career. In this shirt pattern development, I’m sharing two pattern making moves that early in my career caused me some anxiety. Anxiety caused by a lack of information and training. Thank heaven for my hero Natalie Bray! I am sharing the pattern moves needed to turn my basic fitted (dress) block into a loose-fit block and a basic set of moves to draft a gauntlet placket for a classic shirt sleeve.

In the photos below, my fitted block is featured on the left and the fitted shirt made from this block is on the right. The question is, how do you take the fitted block with all its darts and shaping and turn it into a loose fit block.
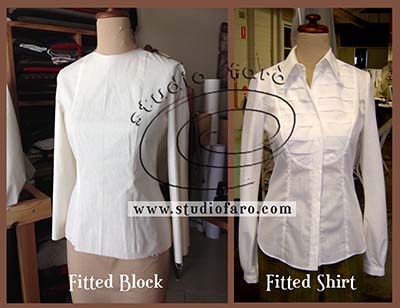
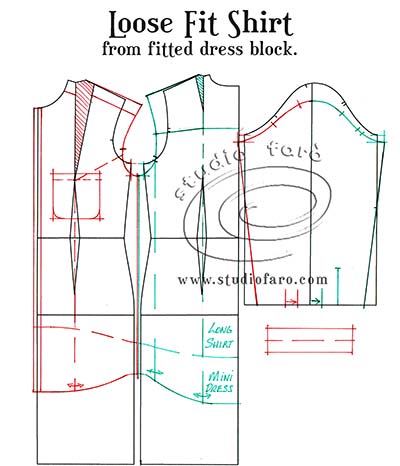
Well, it’s all about how you deal with the darts. Primarily the bust dart in the front block. In this example, I am sending a small amount of the bust dart into the front armhole to relax the fit. The balance of the bust dart is sent through to the hem. If you are aiming for a slimmer fit than this example you could easily send the balance of the bust dart to an underarm dart position.
In the back block, it is only the shoulder dart that we have to eliminate. In this case, I am sending the shoulder dart into the yoke seam to maintain the fit over the shoulder blade. If you would prefer no yoke seam, the shoulder dart can be sent through the hem. However, this will give you a full hem. You are always aiming to have a similar amount of fullness added to the front and back hemlines. If you would prefer a slim fit through the back, the shoulder dart can be eliminated/ignored, and the extra shoulder length absorbed in the extended shoulder line. It is a slightly less refined fit but it is doable.
When you extend the shoulder line, to relax the armhole fit, you will need to remove the same amount from the top of the sleeve head. For the relaxed fit armhole, you will also need to drop the underarm point and add extra garment ease at the side seam. Make the corresponding moves to the underarm point of the sleeve.
Two different lengths are indicated on this pattern plan to suit a variety of garment types. The cuff-end of the sleeve has been slightly narrowed and tucks added to fit it into a conventional folded cuff.
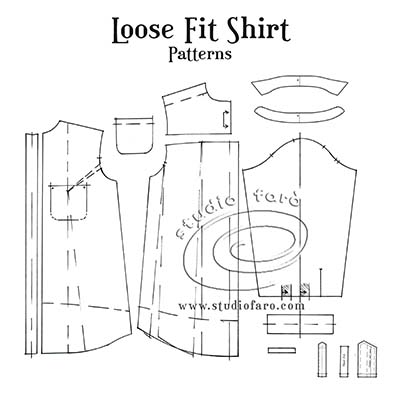
The pattern pieces set out below are for the loose fit shirt. I have added the conventional pattern pieces for the collar, pocket, cuff, placket and hanging loop. If you are making a block rather than this specific pattern you would end up with only three pattern pieces. The front, the back and the sleeve without any style or design references.
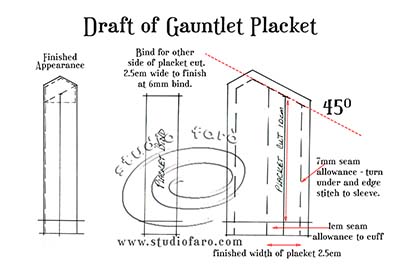
Now for the gauntlet placket. Unlike the continuous sleeve placket, the gauntlet placket has two pattern pieces. The larger pattern that makes up the dominant feature in this garment detail and the smaller bind pattern to finish the other side of the placket cut. The method I have used here is by no means the only way to draft or construct the gauntlet placket. I have seen many variations. This is simply the method I understand best and use in my commercial practice. The instructions are on the diagram. Let me know if you have any questions in the comments section below.
Now all this post needs is for one of our enthusiastic sewers to make a photo tutorial about sewing the gauntlet placket. Any takers? 😉
Addendum: Hoorah! SewNipTuck has a detailed placket tutorial.
If you’d like to buy a copy of these pattern making notes for your own personal use at home you’ll find them here: Loose Fit Shirt – Pattern Making Instructions.
Sorry, the comment form is closed at this time.