16 Jun The Draped Peasant Dress
Last Saturdays #PatternPuzzle pays homage to Yohji Yamamoto’s SS 2002 collection. Fans made very light work of our pattern pieces and had the puzzle solved by lunchtime. Gloria Lucia Sandoval went to all the trouble of printing out the puzzle, cutting and assembling the tiny pieces to make sense of it for everyone. 🙂
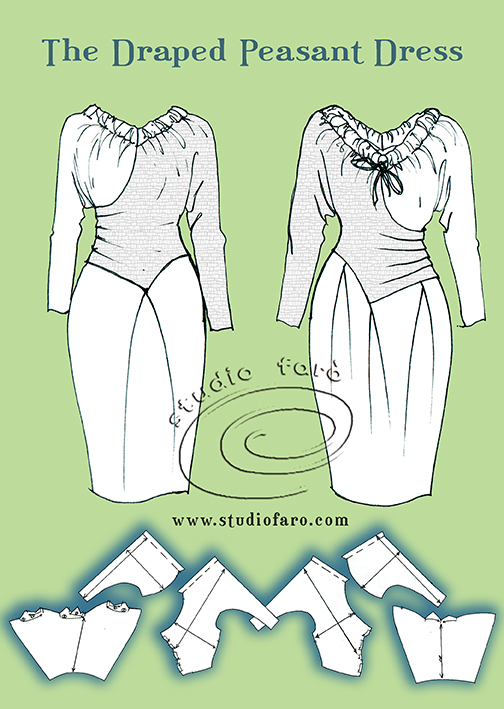
The Draped Peasant Dress has a strong oriental flavour with a Kimono sleeve and a classic but restricted print & colour palette. Inspired by the back view of this Yohji Yamamoto (SS 2002) gown, this kimono styled dress features contrast fabric, a gathered neckline and waistline drape.

The Pattern Plan below starts with:
- Using a Kimono block (woven), trace a full front and back block to make up this asymmetric style.
- Mark in the ‘V’ neckline for the front and the back.
- Decide Sleeve length to suit and calculate the sleeve opening.
- At 900 angle mark half the sleeve opening on front and back.
- Curve back from the sleeve opening to the waistline to form the underarm of the bodice piece.
- Mark in the CF & CB seam curve from neckline to side seam.
- Mark in the hip seams on the front and back blocks, noting the slightly off-centre placement of the peak in the seam. Check that your hip seams flow through from the front to the back on both side seams.
- Check that your hip seams flow through from the front to the back on both side seams
- Mark in the drape tucks from the right side seam to the left side (front & back), connecting with your darts where possible.
- Mark in the radiating lines from the neck to the sleeve and underarm to allow for the introduction of extra fabric for the neckline gathers.
- Taper the side seams of your skirt by approx. 3cm.
- Mark in the position of the large skirt tucks. Three for the front and one in the back.

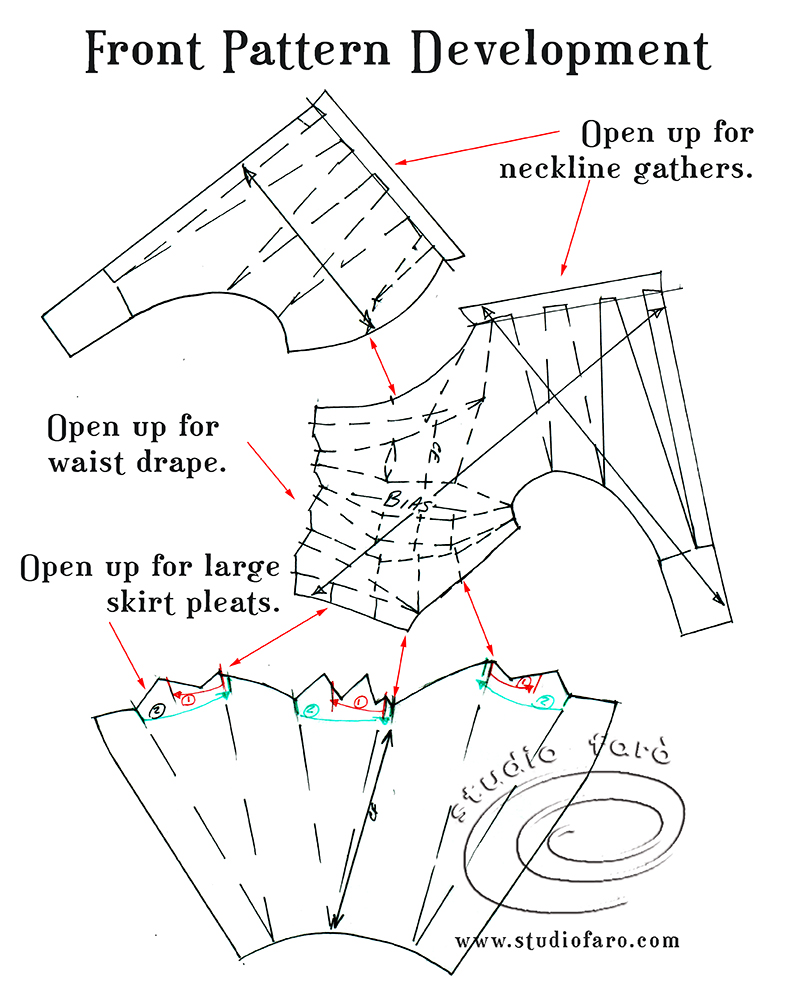
Front Pattern Development:
- Consider your front and back blocks to have three distinct pattern pieces each – left side bodice, right side bodice, and skirt).
- Starting with the front right bodice, trace each section, then open to introduce the extra fabric for the gather.
- Note the wide (4cm) turnback finish on the neckline will encase the neckline drawstring.
- For the front left bodice you can repeat what you did with the right bodice.
- Then work through the mid-section of the pattern, cutting along the lines and closing darts to open up the pattern for the waistline drape.
- For the front skirt cut along the pleat lines and open the pattern up to introduce large inverted pleats.
- Locate the grainline on your pattern to maximise the bias of the fabric in the drape and gather areas.
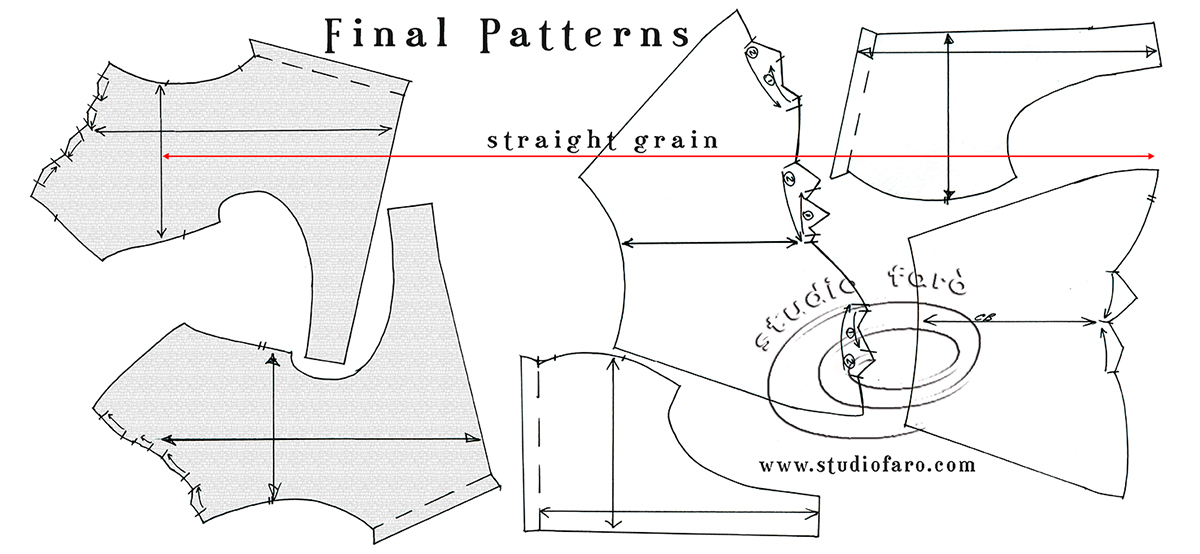
Back Pattern Development:
- Separate the three distinct pattern pieces.
- Starting with the back right bodice, trace each section and open to introduce the extra fabric for the gather.
- Note the wide (4cm) turn-back finish on the neckline will encase the neckline drawstring.
- For the back left bodice you can repeat what you did with the right bodice.
- Then work through the mid-section of the pattern, cutting along the lines and closing darts to open up the pattern for the waistline drape.
- For the back skirt cut along the pleat line and open the pattern up to introduce a large inverted pleat.
- Locate the grainline on your pattern to maximise the bias of the fabric in the drape and gather areas.

- All pattern pieces are cut R.S.U. (right side up).
- The grain placement for the front and back, right side bodices can be altered to improve the waste percentage. This may not suit all fabrics.
- Front and Back Left Side Bodice patterns are cut in CONTRAST fabric.
- Add seam and hem allowances according to skill, habit, quality and/or available machinery.
If you’d like to buy a copy of these pattern making notes for your own personal use at home you’ll find them here: The Draped Peasant Dress – Pattern Making Instructions. Enjoy 🙂
No Comments