01 Aug The Japan Skirt – no block required!
The Japan Skirt – Self-drafted Pattern. Rectangle skirts are nothing new. What maybe new is the way you work your rectangle. This particular pattern has been hanging on my pattern rail for at least 8 years. Originally developed for merino ponti, grading up and down in sizes allows you to cut this pattern in a variety of knit and woven fabrics.

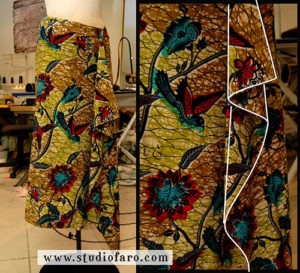
Most important is that the fabric you use is good both sides. The sample below has been cut in an African Wax Print on cotton. These prints are renown for the fact that the better quality versions are printed on both sides. Strange but true! Equally a Merino Ponti will also be good on both sides. In particular, this would suit any drapey, double face fabrics (satin backed crepe).
You will all be aware of Rhonda’s great work with rectangles for many garment types. One post in particular has a fantastic rectangle skirt development that is similar to this #PatternPuzzle.
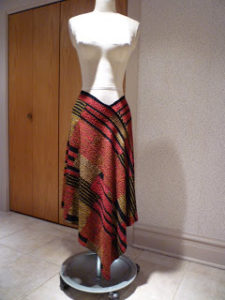
A google image search unearthed a commercial example of a very similar skirt from ZARUG, a creative women’s brand from Bucharest. Please note that this garment has an even hem where the drape meets. Out pattern here will have a variable hem length.

With origins in folk costume and based on a rectangle, The Japan Skirt is simple in construction but versatile in application. This skirt shape has been seen in the collections of Issey Miyake and Akira Isogawa, as an interpretation of the simplicity and elegance of Japanese Folk Costume.
The difference with this rectangle skirt is that I have worked on the fit around the waist with the inclusion of a dart on the only seam. This provides some shaping and a place to hide the invisible zip. Have also varied the hem length to add interest in the hem drape.
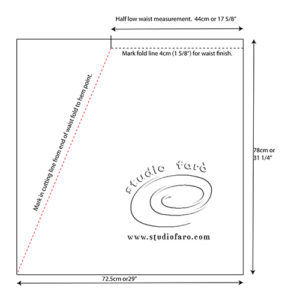
- Draw up a rectangle of half width of usable cloth (72.5cm or 29″) X back length of skirt (78cm or 31 ¼”).
- Measure along the top edge of the rectangle (right to left) for half of your lower waist measurement (44cm or 17 ⅝”).
- Mark the fold-back waist facing 4cm or 1 ⅝” inside top edge of rectangle.
- Mark diagonal cutting line for the placement of shaping dart and zip opening.
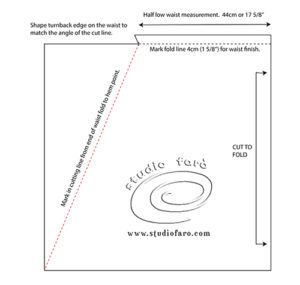
- Mark the turn back waist facing edge to match the angle of the zip opening. In construction, the 4cm or 1 ⅝” turning will be used to enclose the top edge of the zip.
- From turn back notch on waist facing draw a straight line to the outside edge of the pattern. This will be the front edge of the waterfall drape and it does not need a 4cm turn-back. We will add a 1.25cm turning for a rolled hem edge.
- Mark in the ‘cut to fold’ (right) side of the pattern.
- Cut along the diagonal line and open for the dart allowance and the opening for the invisible zip.
- This dart opening will have the smallest possible seam allowance (0.7cm or ¼”) added to sew in the zip.
- This opening will also need to be at least 18-20cm or 7 ¼-8″ long for the inclusion of a zipper.
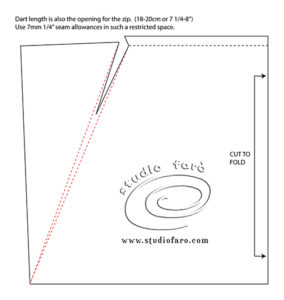
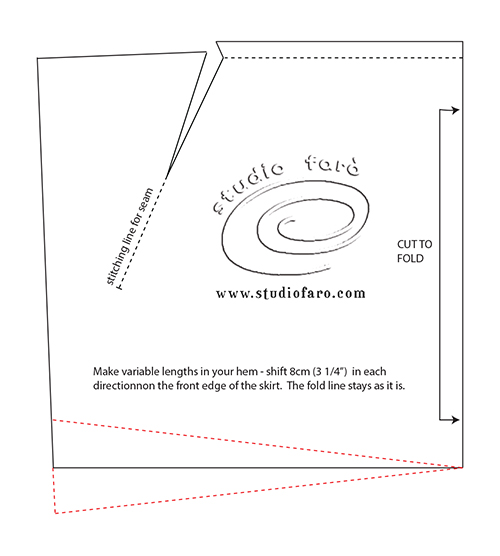
- The stitching line for the seam that comes from the end of the zip should extend for at least another 20cm or 8″ past the end of the dart.
- To make a variable hem length, mark 8cm or 3 ¼” above and below the existing hem line.
- Redraw new hemlines and eliminate the original line.
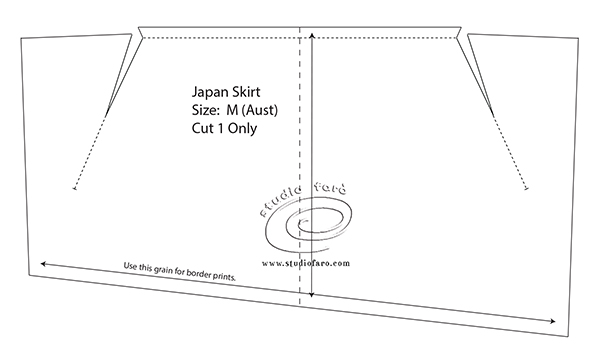
- Draw out the full and final pattern piece with your straight grain parallel with the fold.
- An alternative grain may be the hem line if you are cutting a border print.
- The outside edges of the skirt have a 1.25cm or ½” hem allowance for a rolled hem finishing 6mm.
- The zip opening already has a minimal seam allowance (0.7cm or ¼”).
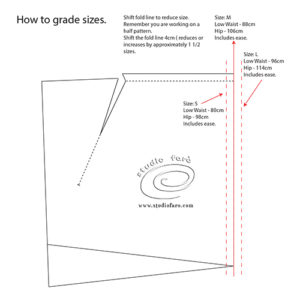
Grading for different sizes and different fabrics is relatively easy on this skirt style. I have indicated a larger than usual grade increment of 8cm (3 ¼”) between sizes (4cm or 1 ⅝” on this half pattern). The simple shape of this skirt gives it some flexibility in fit. When looser in fit it sits lower on the waist and as the fit gets tighter the skirt simply sits higher on the waist. This flexibility is enhanced when this skirt is cut in a stretch fabric. Thinking Merino Ponti as a fab winter skirt.
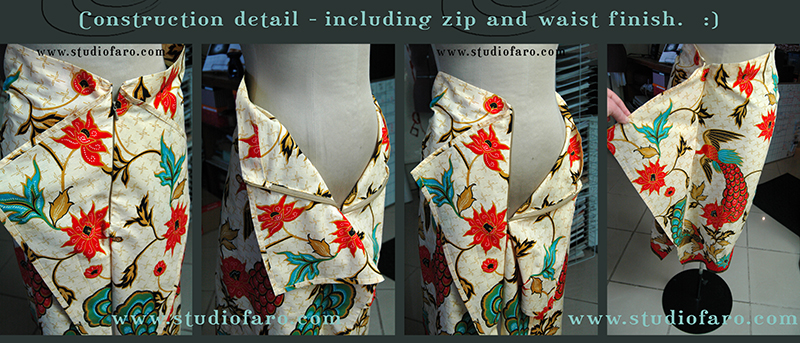
The photo series below added 09.09.14. Detail for the construction of the zip and seam. 🙂 Sew skirt and drape seam allowance together first, for each side of the seam, before inserting zipper.
Hoping you all enjoy the experience of a self-drafted style. We would love to see the variations you sew together. Comment below if you would like to showcase your efforts here or if you have any questions.
Enjoy 🙂
Annelie Van Eck
Posted at 13:59h, 20 AprilGoodday Anita, what a privilege to meet you, your presentation so professional, so unselfish to me and so many others out there, guidance and teaching, so clearly on the drafting and sewing THE JAPANESE SKIRT.
GOD BLESS YOU.
Thanking you.
Studio Faro
Posted at 15:32h, 20 AprilThank you Annelie, are you thinking of trying the pattern making instructions? I’d love to see your sample. 🙂