02 Mar Transparent Bomber Jacket
Inspired by a delicate sketch in my visual diary from many years ago, the Transparent Bomber jacket is a summer season take on a recent winter trend for classic bomber jackets. This design will rely on a lightweight transparent fabric that will gather well with the elastic bands and still hold a soft, full shape.
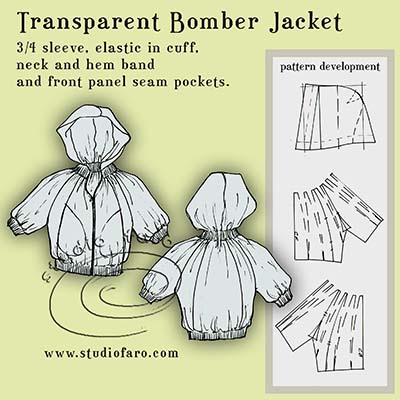
The block I have used for this pattern in my kimono block for woven fabric, working well outside the block fit to achieve the fullness required in this style. You can make your own Kimono Block using my garment blocks.
To begin your styling:
- Mark the new necklines 1-2cm from the original block neckline.
- Mark in your jacket length plus band width on the front and back block.
- Extend your side seams by 4-5 cm then connect the side seam back to the under arm area.
- Draw in your raglan seams, connected to the gusset line, and extended to meet the new side seams.
- Mark in your sleeve length along the overarm seam then extend your sleeve width by 3-4cm.
- Connect your sleeve opening back to the new underarm point.
- Mark in front and back bodice panel seams. Add a pocket bag to the front panel seam.
- Mark in cut lines through each panel piece and sleeve to allow the neckline to open up and provide the extra fabric for the elastic to gather.
- Build the gusset allowance need by the bodice and sleeve in the raglan seam. In this loose style, a 2cm gusset is more than enough.
To draft the hood, take two measurements around your head:
- The first measurement is for the hood opening. In this case, the opening is loose and generous.
- Then measure around the back of the head for the depth of the hood.
- Use these measurements to build a rectangle using half of each measurement. That is half hood opening by half hood depth.
- Draw a curve in the top right corner for the shaping over the back of the head. Hoods will need some refinement in the first toile fitting to get the shape to sit well. The dart like shape in the back hood is sometimes used to remove excess fabric and smooth the hood curve over the head.
- The lower edge of the hood will need to equal the new, expanded neckline from your pattern development.
- To increase the neck edge of the hood open up the front and back lines to equal the new neckline on the jacket.

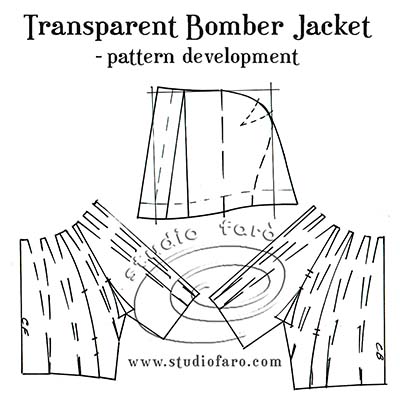
For the pattern development:
- Open up the front and back kimono bodice and sleeve to include the extra fabric for the neckline gather.
- Open up the lower edge of the hood so it matches the new neckline measurement.
- Remember to include the gusset allowance in the underarm for lift.
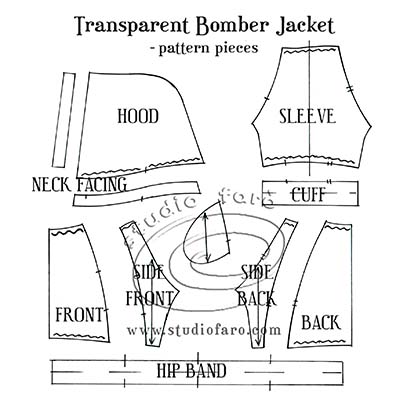
For the final pattern pieces:
- Separate the sleeve from the front and back bodice and join as one pattern.
- Trace the separate panels for the front and back bodice. Trace the pocket pattern piece.
- Trace a neckline facing to hold the elastic and a facing for the opening of the hood.
- Trace full pattern pieces for the sleeve cuff and hip band.
- Your choice of seam allowances will depend on fabric and finish. As a transparent garment, the seams on the inside of the garment have to be as good as the outside. French seams, bound seams or flat-felled seams will hide the raw edge of the fabric without having to use an overlocker.
So much in the success of the style will depend on a good balance between the fabric choice, the width of the elastic and the amount of volume included in the pattern making process. For lightweight fabrics try to use the lightest possible zip you can get your hands on.
I hope you enjoy the development of this new idea. If you’d like to buy a copy of these pattern making notes for your own personal use at home you’ll find them here: Transparent Bomber Jacket – Pattern Making Instructions. Enjoy 🙂
No Comments