26 Feb Twist Overlay
Posted at 13:03h
in Pattern Making, Pattern Making Instructions, Pattern Puzzles, Stretch Patterns, Womens Knit Block
0 Comments
Did you ever think there’d be so many designs using Twist Drape? I was totally captivated with the asymmetric aspect of this design and the layering effects that can be achieved using two different fabrics and my knit block. Like the majority of previous twists you’ll definitely need a two-way stretch knit for this to work well. The elastane (Lycra/Spandex) in your knit fabric is the best tool for achieving a snug fit with this method of making twist patterns. If you’d like to learn my method for creating Twist Drape Patterns I have a detailed worksheet for making Jersey Twist Patterns. For just a few dollars you’ll get the same training you’d get if you came to the workshop in my studio.

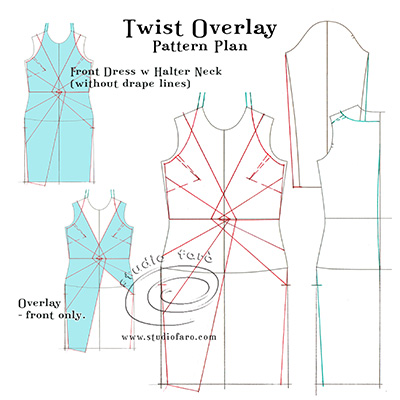
This particular dress design has one back pattern, one sleeve pattern and two front patterns. The two front patterns are made up of a halter neck underdress and the twist overlay. They connect at the side seams only. Using my knit block, or similar commercial pattern:
- Trace a full front and half back and sleeve for your pattern plan.
- For the front twist overdress I’ve placed the twist on the waist line, at centre front, with an overlap between right and left sides of about 6-8cm in total.
- Taper (3cm) the side seams from hip to hemline for front and back.
- Draw in your drape lines from this location, radiating out to the side seams. These lines indicate where the drape will be after the twist is sewn in place.
- Please note that the hem of the overdress is asymmetric; much lower on the right side and higher near the hip on the left side of the dress.
- The halter neck underdress is sleeveless with a gape dart in the armhole to improve fit.
- Add the extension for the back halter neck onto the front straps.
- Alter the back neckline to meet with the shoulder line of the overdress with a small gape dart near the shoulder.
- Add shape to the CB seam at the waist line (1cm), taper to hip and shoulder blade.
- Alter the knit block sleeve for a slim fit through to the wrist.
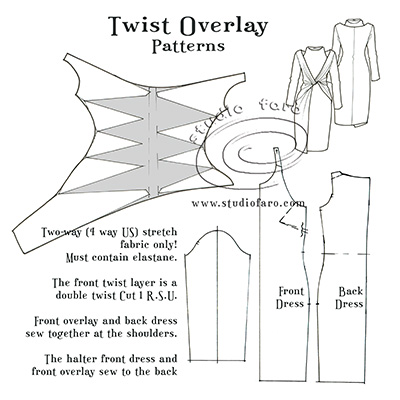
Trace your final pattern pieces:
- Trace the front underdress, back and sleeve patterns allowing for the gape dart alteration.
- For the front overdress trace the left side front shape, including the drape lines.
- Then separately trace the right side front shape of the overdress and include all the drape lines.
- Cut along all drape lines and position as the sketch below to develop your twist pattern.
- For heavy knits add less fabric in the twist. For light knits add more extra fabric in the twist.
- This front overdress will be turned twice to make the twist before it’s joined to the side seams of the dress.
- Add hem and seam allowances that suit your particular machines and techniques.
I hope you all enjoyed this pattern making post. Let me know if you’d like to try this particular design. I’m always here to answer any of your questions. 🙂
If you’d like to buy a copy of these pattern making notes for your own personal use at home you’ll find them here: Twist Overlay – Pattern Making Instructions.
No Comments