19 May Wrap Layer Top #1
The designs used in last Saturdays #PatternPuzzle conversation are the surplus design developments from the Layered Shirt post of a few weeks ago. They have been lying around on the work table all that time and I didn’t have the heart to throw them out. Then I realised, that was because I really wanted these two tops for myself. They were just the kind of thing I needed in my wardrobe. Saved from the shredder, these designs are similar but different enough to entice you to make both. I will be dealing with them in two separate posts to make sure I cover all the detail. 🙂
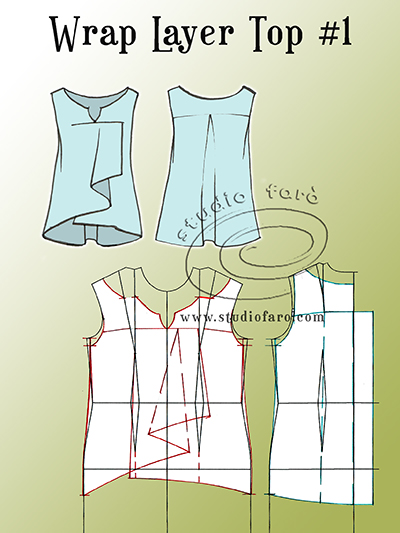
Working with my fitted dress block, trace up a full front for asymmetric styling and a half back:
- Mark in the new shoulder seam width according to your own style. I have placed my narrowed shoulder (4-5cm 1⅝- 2″) wide on the shoulder-line in this case.
- Reduce the Underarm Point (UAP) by 1cm for sleeveless styles. Then drop the UAP 1-1.5cm for summer comfort.
- Shape the front and back neckline as indicated in the design. The CF neckline shape connects with the horizontal dart-seam in the front top.
- Mark in the back yoke line making an allowance for the transfer of the shoulder dart into this seam.
- Add the CB pleat (5cm/2″ on the half) onto the CB line below the yoke and mark through to hemline. The back hemline is 10cm (4″) below the hip line.
- Mark the hemline through to the front (2cm (¾”) below the hip line), keeping the CB slightly lower than the side seams (6cm (2⅜””) below the hip line) that are slightly lower than the front.
- Mark in the front horizontal seam above the bust by 4-5cm (1⅝-2″). This line is easily moved if you prefer the feature to be below the bust line.
- Draw in the front wrap and drape feature to the scale that suits your pattern. Please note the wrap covers the area between the bust points at the horizontal seam.
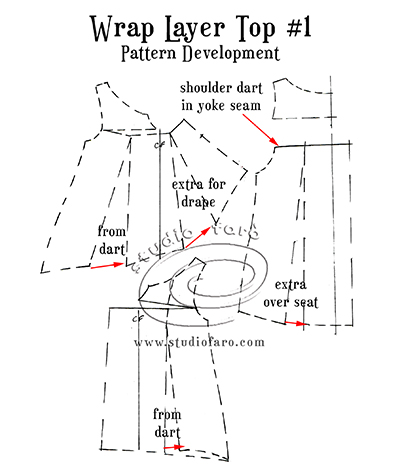
The pattern development above shows:
- The bust darts used in the front to create fullness in the hemline.
- The addition of the front drape in the wrap by opening up the front pattern.
- The transfer of the back shoulder dart into the yoke seam.
- The back hemline increased to give this top the loose fit around the seat.
- Keeping the front shoulder area attached to the main pattern will mean sewing a horizontal dart seam across the front of the garment. The finishing of this dart shape seam is crucial to it sitting flat on the wearer.
- If that is all too much, then extending the dart seam into a yoke seam is very acceptable and definitely more production friendly.
- Because we need to block fuse the front neckline facing it would be wise to stabilise the back neckline during making. This can be done by using Tear-away on the neck seam. Must be removed before finishing the garment – hence the tear-away reference.
- To finish the last section of the armhole (front and back) use an inside bind to finish at 6mm (¼”).
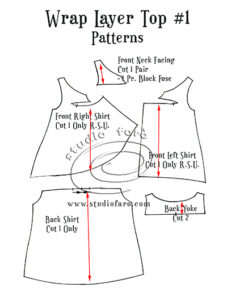
The final pattern pieces are set out above with grain line and pattern notations. With this style I would use 1.25cm (½”) seam allowances to make either open seams or french seams depending not he fabric used. All turn-back edges will have a 6mm (¼”) seam allowance and hem allowances of 1.25cm (½”) for a rolled hem finishing 6mm (¼”).
Hoping you all enjoy this first instalment of the Wrap Layer Tops. Let me know if you have any questions, I’m always happy to help. 🙂
The second instalment is now available on the blog: Wrap Layer Top #2
If you’d like to buy a copy of these pattern making notes for your own personal use at home you’ll find them here: Wrap Layer Tops – Pattern Making Instructions
No Comments