12 May Cowl Drape Dress
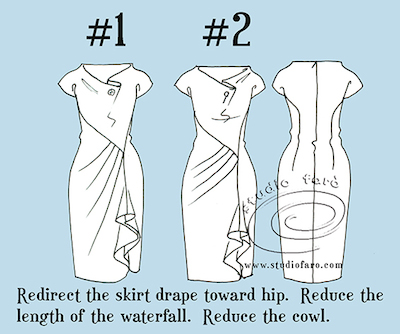
Oh, good grief! was the first response to our Saturday morning #PatternPuzzle. However, by mid-afternoon all was solved and the sketch delivered. The Cowl Drape Dress features a wide, built-up neckline that leads to a folded cowl. The front dress panels are led out of the cap sleeve armhole and head toward the low waist area on the left side of the dress. Deep tucks are set into the skirt panel and meet the side body panel in a waterfall drape. The Back panels are also led out of the cap sleeve armhole and end just above the seat. There is a CB invisible zip from the neckline to the hip line.

I had a rare opportunity this week to toile up the #patternpuzzle and found it a great exercise in refining my pattern making. So I cut the pattern using my fitted dress block for woven fabric.
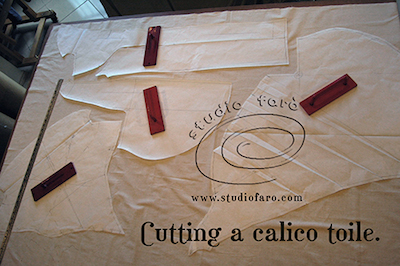
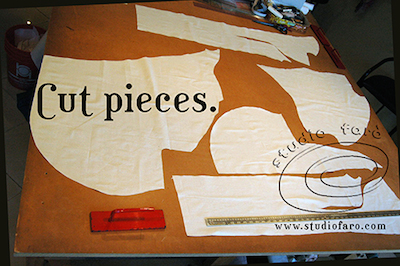
Then cut it in calico.
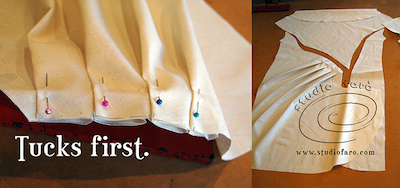
And sewed it all together.
And fitted it on the stand and on myself. My most important alterations are:
- To reduce the amount of cowl in the front neck.
- To redirect the skirt drape toward the hip area and not the hem.
- To square off the waterfall detail and move it further down the dress to enable a better fit around the seat and thighs.
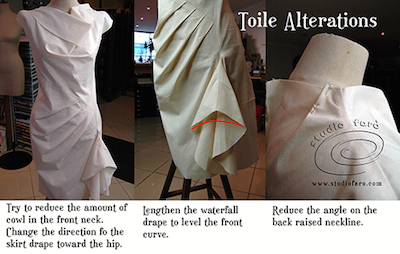
- To pinch in and alter the back collar to sit better.
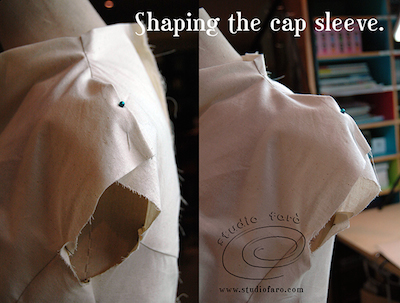
- To reshape the cap sleeve to fit the shoulder better.
So the pattern instructions I bring you today are for version #2 of this dress with the alterations built into the instructions
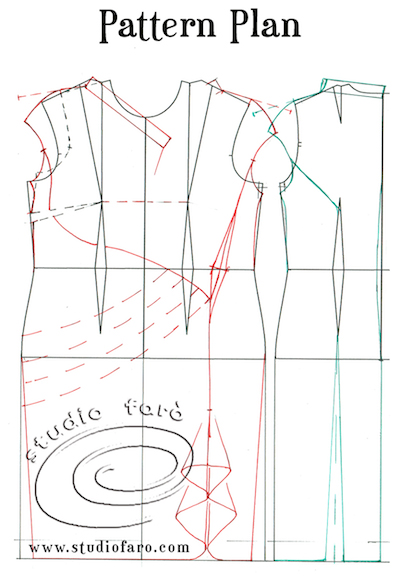
Using my fitted dress block for woven fabric:
- Extend the shoulder line for a cap sleeve of 8cm, then curve to fit the shoulder. The drop is approx. 4cm.
- Draw in the new neckline from a mid-shoulder point, to a high ‘V’ neckline.
- Add a 3cm rectangle as the basis for a built-up neckline.
- Curve the right-side panel seams out of the new cap sleeve armhole, around the bust and toward the left side low waist.
- For the left side panel seam curve from the same point in the armhole toward the left side low waist position.
- Transfer the left waist dart onto the new panel line.
- Extend the left side panel line through to the hem.
- Place your waterfall feature on this line starting near the top of the thigh.
- Mark in the dashed lines for the skirt drape to be included.
- Taper the side seams of the skirt.
- Build similar cap sleeve, panel lines and built-up neckline for the back dress.
- Taper the back dress below the back waist dart to allow for a panel/dart in the back dress.
- Shape the back waist by min. 1cm through to the hip and across back levels.
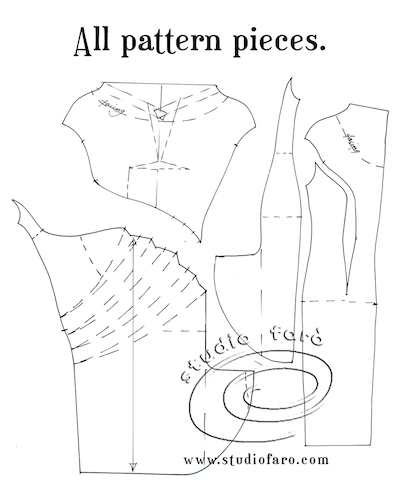
Make your separate pattern pieces:
- For the front upper bodice transfer all the bust darting into a front neck cowl with a deep turnback facing.
- Cut open the skirt section of the dress and add 8cm for each tuck. Lift the line for the waterfall drape to a 90 degree angle and curve back to the hem.
- Copy the left side panel shape and add the same waterfall drape to the panel seam.
- Taper the back dress by folding out 4-5cm under the back waist dart. This will open up the panel toward the armhole and allow for the addition of seam allowances and cutting.
- Add a deep facing to the back built-up neckline.
Let me know if you have any questions about these pattern instructions. You’ll find my first sample notes and instructions here. Leave a comment below or email me direct. Enjoy 🙂
No Comments