12 Jul Pattern Alterations – Flare and Gather Dress Pattern
Posted at 12:12h
in Fitting Patterns, Pattern Fitting Tutorials, Pattern Puzzles, Sewing Pattern Alterations
0 Comments
Now that the first sample has been made and fitted I’m able to bring you all the pattern alterations I have made to get this new design to work. I’m still fascinated with this design and hope the final pattern is something worthy of all this sampling effort. If you’d like to see the original pattern puzzle post you’ll find it here: Flare & Gather Dress
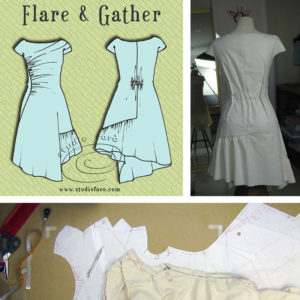
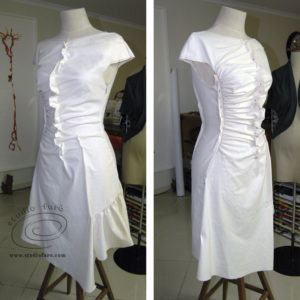
It was a fun pattern to make but the sample below does show you how much work goes into these complex designs. And even at this stage there’s still a lot of work to do. In this post I’ll take you through most of the important changes I made to this pattern before going onto a second sample.
The fit alterations for this design are as follows:
- The waist fit has to be increased (front and back) to hold the drape in place.
- The front bias panel needs quite a lot of reduction to compensate for excess garment ease in the dress block and for the growth of the fabric on the bias.
- The fit needs to be released over the backside on the left and right side (full butt adjustment).
- The front neckline needs to be tightened and dropped by about 2.5cm.
- The cap sleeve needs to be shortened by about 3cm.
- The differential between the front and back hem is too much and needs to be reduced by dropping the back hemline by about 6cm.
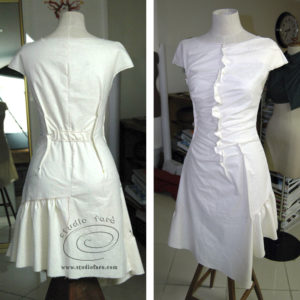
For the fit alterations that I’ve pinned on the first toile, I mark them up in pencil or pen on the calico. Then I take the calico toile to the pattern and transfer all the alterations onto the pattern.
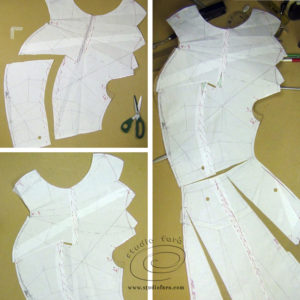
To give the dress silhouette a sharp waist I’ll have to increase the waist shaping in the back and the front dress (above).
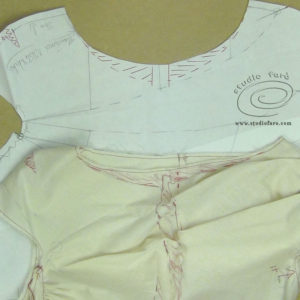
On the front right side panel (below) I have an opportunity to add more shape to the back side of the seam for the waist area. For increasing the waist shaping in the back dress you’ll find those notes a little further down in the post, together with hip fit alterations.
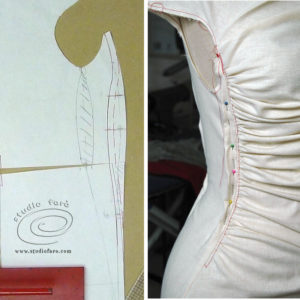
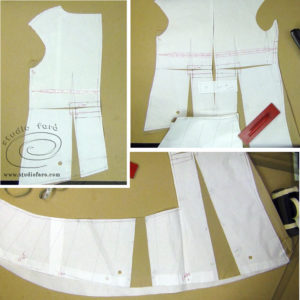
In the image below you can see the front bias panel, with all the gathered drape, needs to be tighten up to make the drape work across the front of the body. If you would like to minimise the effect of the bias cutting on the fit you can start with a dress block that has less garment ease through the torso of the dress block.
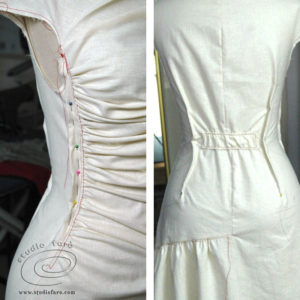
So this is something that happens to most bias cut dresses and will vary according to the fabric you use and how much garment ease you have in your dress block. Any fabric cut on the bias has the tendency to grow and you can see in the front of this dress I’ve got loads of extra fabric pinned out through the centre front. This is a very tricky pattern alteration. So I’ve decided to take the excess fabric out through middle of the pattern (below). You also have the option to remove this excess from the gather seam but you will have to be careful to maintain the seam shape.
Looking at the image below you can see the fit over the backside has a tendency to grab (left side image). To release the fit I’ll be cutting through from the hem to the waist to add more width on the hip line (right side image).
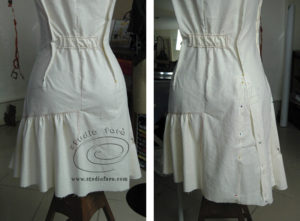
In the image below you can see how I’ve cut through the back pattern from hemline to waist. This move serves two purposes, one to release the fit over the hip and secondly to reduce the back waistline fit. I’ve made the same move on both the left and right hand side of the pattern.
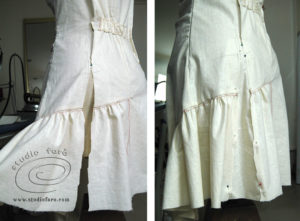
This is an ideal move if you find you have too much grab on the backside in your dress fitting.
This final image is the beginning of the second sample testing. I’ve used brown paper to show all the the pattern alterations that I’ve made to the first sample pattern.

Subscribe to my newsletter if you’d like to see how the second sample comes out. If you’d like to buy a copy of these pattern alteration notes for your own personal use at home you’ll find them here: Flare and Gather Dress – Pattern Alterations and Second Sample. 🙂
No Comments