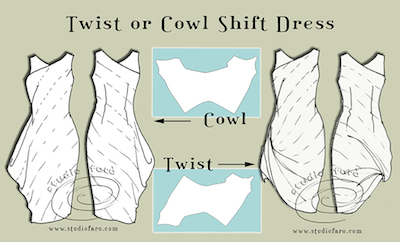
26 May Twist or Cowl Shift Dress
When I first posted the sketch of the two versions of the Drape Shift Dress on FB Saturday, I labeled the cowl shift dress as a drape and created a little confusion. Happily Mioara came to our rescue with some clarity on the use of these terms.

All fixed now with the best use of terminology and all of us a little wiser. 🙂
In working up the ideas for this weeks #PatternPuzzle, I began with the Cowl feature on the right side of a bias-cut shift, thinking I would like to use a wide stripe fabric. I really loved the idea of the bias-placed stripe running off the edge of the dress into the cowl drape. When I sketched up the first patterns I realised the dress could be featured in two different ways. This is how it happened.
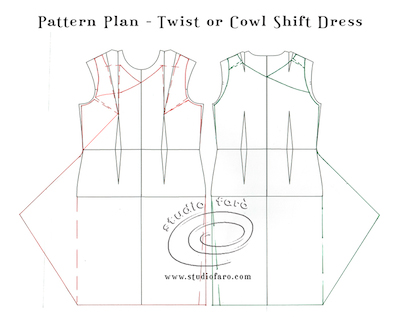
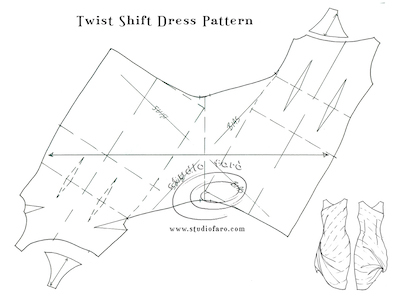
The Pattern Plan is based on my fitted dress block to 5cm below the knee level.
- Firstly remove 1cm at the underarm point to 0cm at the waist to shape for a sleeveless style.
- Mark 4cm from the shoulder point to start a 5cm wide shoulder strap.
- Reshape the armholes, to the underarm point, and mark in a 1cm gape dart. This is standard for a sleeveless armhole to ensure it fits close to the body and does not gape.
- Mark in the neckline that crosses over at the CF as a ‘V’ and continues to the right armhole.
- Mark in the new dart positions – right side from waist to bust point and left side from armhole to bust point. The placement of the dart lines is to follow the bias grain of the fabric and disappear into the wide stripe of the fabric.
- Repeat the process for the back. Gape darts for the neckline are placed high on the strap and are approx. 6-8mm each.
- Extend drape from right side waist (front and back) for a 45 degree angle. Length of this line is slightly more than half-way down the length of the skirt. Angle the line back toward the right side seam at the hemline.
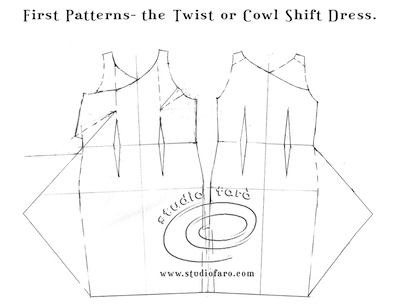
Below are the first sketches of the front and back dress patterns before they are pasted together. At this stage, you have the option of separating the right shoulder pieces or treating the dress as one, without the asymmetric seam at the neck.
The first pattern shape was for the Cowl style drape and I am happy with the pattern. However, I felt it may not challenging enough for our #PatternPuzzle audience and so the Twist style was born.
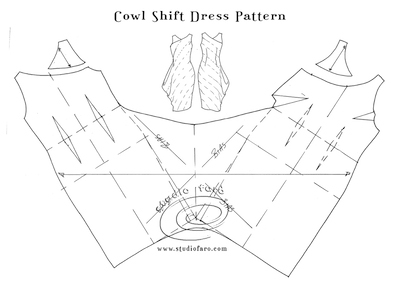
In the twist version of the pattern, one of the pieces is flipped and they join together on the drape line. This amounts to a single twist style and would require a double-face fabric that is equally good on both sides of the fabric. There is a small amount of risk with the twist in a woven dress and it is difficult to be certain in the first pattern exactly how much extra fabric is required to make the drape work. That is the beauty of the experiment and the possibility of new and interesting results. An invisible side seam zip, left side, would be the best for both the dress styles.
Thanks for dropping by and reading our posts. Please leave your comments and questions below, we love to hear from you.
Enjoy 🙂
If you’d like to buy a copy of these pattern making notes for your own personal use at home you’ll find them here: Twist or Cowl Shift Dress – Pattern Making Instructions.
You’ll now find the First Sample post here – First Sample – Twist or Cowl Shift Dress
Studio Faro MAKERS: Handmade by Carolyn
Take this moment to sign up for my fabulous newsletter! Every month or so I send an email newsletter with new website content and always, always an enormous discount code for all my sewing patterns, garment blocks and pattern making instructions.
This discount code is for subscribers only. Don't miss out!
No Comments