14 May Using my Knit Block
Posted at 13:21h
in Garment Blocks, Pattern Making Instructions, Stretch Patterns, Womens Knit Block
2 Comments
Every now and then I like to put together a blog post that details some of the garment blocks and techniques I use when making patterns for my industry clients and my website. This post is to highlight the features and potential of my knit block for all users and new pattern makers. It may help you decide if it is in fact the block for you in your new design project.
My Knit Block is sized for two-way stretch knit fabrics only. By that I mean you should use knits that have an elastane (Lycra, Spandex) content that will give you two-way stretch in your fabric. These knits stretch equally well in both directions. In the US they have slightly different terminology and refer to these knit fabrics as four-way (equiv. to our two-way stretch) and two-way stretch (equiv. to our one-way stretch). The fit on this block is body-conscious with the measurements showing negative ease. By that I mean the garment is cut smaller than the body measurements for a close fit. Best examples are sportswear, fashion knitwear, dancewear, and some lounge/lingerie items.
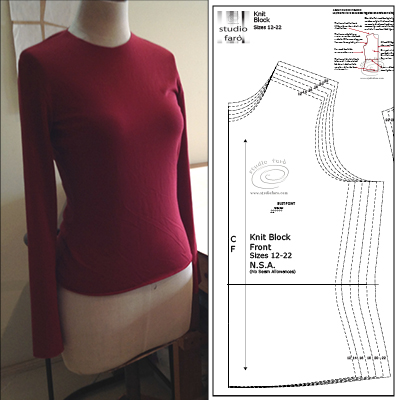
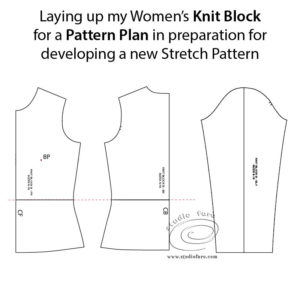
If you prefer the fit in your knit block to be less body conscious, then selecting the next size up for your knit block will be a good idea. If you are thinking of cutting your garment in a one-way stretch knit (stretches along width of fabric only) then I suggest you use the next size up as well. The diagram below details all the features of this knit block for your information. When you trace off your size of this block you can compare all the pattern pieces to the diagram below to understand what you’re working with before you start your pattern making project.
The features of this block in detail:
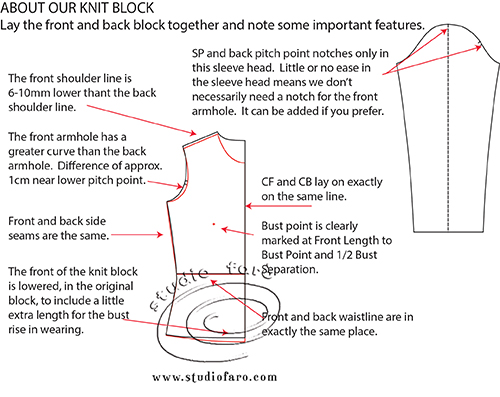
- The front shoulder line is 6mm lower than the back shoulder line. That’s common in patterns when the front and back are very similar in fit and shape. The higher back helps in keeping the balance in the fit of your garments. If the back shoulder is not higher than the front your garment will often drag backwards on the body.
- The front armhole has a greater curve than the back armhole. The difference is approximately 1cm near the pitch point in the armhole.
- The front and back side seam are the same.
- The lower front edge of the knit block is lowered, in the original block, to include a little extra length over the bust for lift in wearing. By bust rise I mean the lift you get in the front of your tee shirts because of the longer length measurement over the front body.
- The CF (centre front) and CB (centre back) lay exactly on the same line.
- The bust point (BP) is clearly marked on the block.
- The front and back waistline are in exactly the same place.
- The sleeve head has only the shoulder point (SP) notch and back pitch point notch. There is very little ease in this sleeve head and you don’t really need a front pitch point notch, but it can be added if you prefer.
For you first toile fitting you should use two-way stretch fabric and test the fit in a top length. When you’re happy with the fit as a top length then you can convert it into a dress block and re-fit to make sure the side seam and hip line fit are working.
I have a number of posts that will assist you when working with my Knit Block:
When I’m setting up to make a fitting toile or a new pattern I always start with my selected size in the knit block and lay it up as follows. It is the most logical way to lay-out your knit pattern in preparation for pattern making.
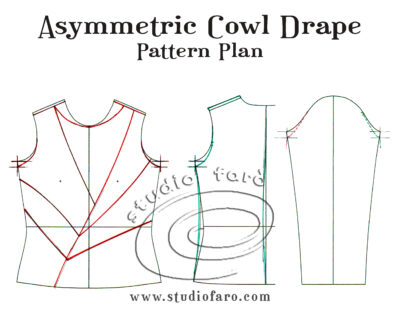
When you have decided on your design for your new pattern you can plan out all the changes to the block on your pattern plan. My example below is how I always cut patterns and it helps me work out all the steps and changes I need to get to my new pattern shape.
As soon as you are ready to begin the pattern making process, checkout my stretch pattern blog posts for new design ideas for stretch-patterns
Muriel Tillman
Posted at 08:26h, 27 NovemberHello Ms. McAdam,
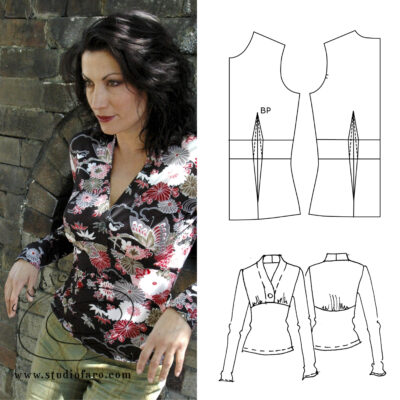
I am new to your blog/newsletter. When purchasing “Balenciaga Evening Overblouse” instructions, is it necessary ro purcgase instructions for the knit block? I am very interested in attempting to draft the Balenciaga overblouse. Is there any other info I will need to be successful at making the blouse?
Studio Faro
Posted at 13:52h, 27 NovemberHi Muriel, thanks for getting in touch. All depends on whether you are making your blouse in a knit or woven. If knit I do have a knit block doe sale on this website: https://www.studiofaro.com/product/womens-knit-block/
But you don’t necessarily need to buy that block. You could use a basic tee shirt pattern you already have in your stash.
If you’re thinking of cutting your blouse in a woven then again, search in your stash for a dartless woven pattern that has a good basic shape and high round neckline like a bock. You can use this as the basis of your drafting.
If you’d like to ask questions as you go along you can do that here on the blog or join my FB group (STUDIO FARO MAKERS) where you’re able to post photos of progress to get some assistance when drafting. I check my blog and into FB everyday so you won’t have to wait long for answers. 🙂