29 Dec Vintage Bodice
Once again I have been seduced by a Vintage Fashion Illustration promising so much in fit and style. Add to that the fact that this bodice promised to be one of those fascinating one-piece patterns. They were so thoroughly investigated in the first half of the 20th century when manufacturers were looking for a reduction of machine processes for the mass manufacture of fashion. This blog now has a great number (5) of these style of blog posts which I plan to develop into a more detailed post in the future.
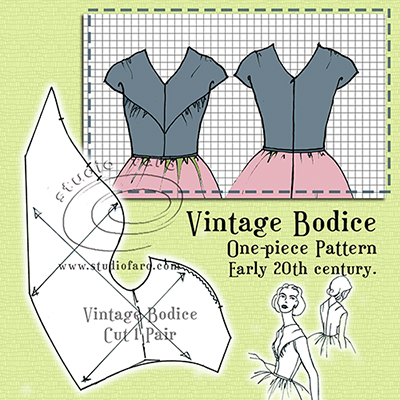
There is some variation between the pattern instructions set out below and the illustration. These are mostly practical pattern making choices that dictate what is actually possible in the real world. In particular, the neckline in the instructions is assumed a straight line as the illustration suggests. However, the only way to achieve a straight line is to make the ‘V’ neck a little deeper in the front.
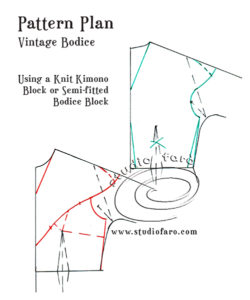
The pattern plan below is based on a knit kimono block with the inclusion of a waist dart built on the waistline to sharpen the fit of the waist, so necessary in vintage styles.
Begin by:
- Extending the shoulder line beyond the shoulder point, according to your taste. Here approx. 8-10cm (3 1/4-4″). This shoulder line may be left straight or shaped over the shoulder with a curve.
- Join the cap sleeve length through to the armhole curve and under arm point. Straighten the underarm point area to remove unnecessary fabric.
- On the front block, continue the curve from the cap sleeve into the front panel seam. Shape it over the bust area to leave room for the gathers to shape over the bust.
- The front waist dart shaping is transferred to the front panel seam to make the gathers over the bust.
- The back waist dart is shaped off the side and centre back seams.
To develop the pattern:
- Trace the back bodice, removing the back waist dart allowances off the side and centre back seams.
- Place the front and back shoulder lines together and trace the front upper bodice onto the back bodice, therefore eliminating the shoulder seam.
- Then place the front and back side seams together and trace the front lower bodice onto the back bodice.
- The front waist dart is transferred through to the front panel seam edge. In most cases, this will not be enough extra fabric to form an effective amount of gathering.
- To introduce extra gathers into the front panel, seam split open the front lower bodice and open it up as if you were making a full bust adjustment.
- An example of this is on the left in the diagram below. I have suggested that 2cm is added to the width and length of the pattern.

Set out below are three different versions of this bodice pattern:
- One with minimal gathers in the front panel seam.
- The second with full bust adjustment.
- And the third with the shaped cap sleeve.
The grain line has placed the bias along the neckline edge. There are a number of places for the grain in this pattern. Parallel to the centre back or parallel to the centre front is also very acceptable.

If you have any questions regarding this Vintage Style bodice, please don’t hesitate to use the comments section below.
Enjoy 🙂
MAKERS
More in our MAKERS Pinterest Album
No Comments