18 Jan Vintage Bodice – Full Bust Adjustment
Posted at 10:45h
in Fitting Patterns, Pattern Fitting Tutorials, Pattern Puzzles, Self-draft, Sewing Pattern Alterations, Vintage Patterns
0 Comments
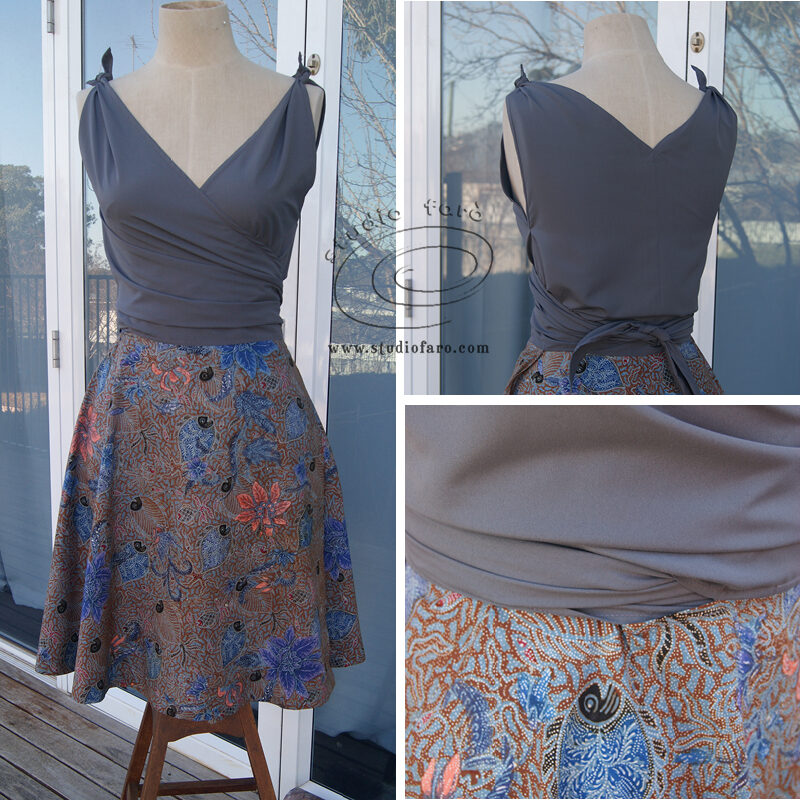
To begin, a quick recap of previous posts for the Gil Brandao, Conjunto Pratico. You can start with the first post, the self-draft instructions for this vintage bodice. If you think you’d like more detail you can download my detailed worksheet – Vintage Style Pattern Making. The instructions in the worksheet include information for drafting different sizes, from 6 to 22. If you’re unable to access the worksheet there is a post where I outline the grade rules to make the original draft in to other sizes – Grade Rules – Gil Brandao Conjunto Pratico. Taking the vintage bodice further I have a post with the instructions for adding a skirt to the vintage bodice to make and wrap style dress –Vintage Bodice as Dress – Fist Sample.
In my experience, just about every home sewer needs to understand several different ways of making a Full Bust Adjustment (FBA) on a number of different pattern shapes. Not so long ago I had a request from a fan wanting to know if it was possible to make a FBA for this pattern puzzle, Gil Brandao, Conjunto Pratico. In response I’ve developed the diagrams below for a FBA adjustment on this self-draft vintage bodice. I’ll take you step-by-step through the process and give you a few alternatives for the finished garment.
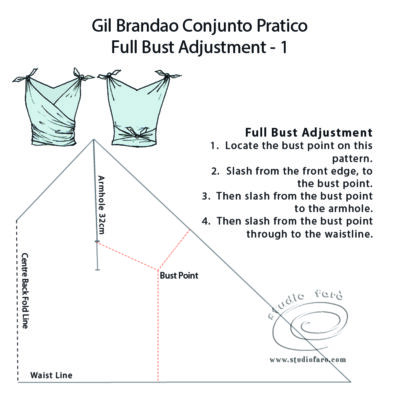
- Locate your bust point on the pattern by trying on a toile and marking the exact point.
- Draw in cutting lines from the bust point to the neckline, armhole and waist line.
- Cut through the lines that connect the neckline to the bust point, through to the waistline.
- Open up the neckline through to the waist for 1-2cm each depending on how much fabric you need to add for your adjustment.
- You have increased both the bodice length and width as needed for a fuller bust.
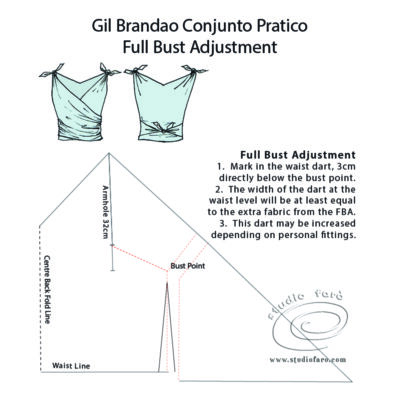
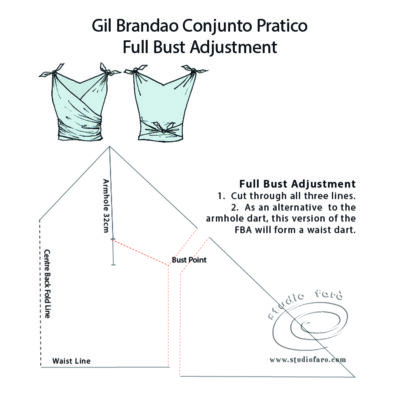
- Mark in a symmetrical dart, below the bust point, that is as wide as the FBA alteration (1-2cm).
- The dart arms should finish about 3 cm below the bust point. These are the sewing lines for the bust dart.

- Fold the dart closed at the waistline and mark through the outside edge using your tracing wheel.
- If you find the neckline is still a little loose you can gape dart the neckline and add that extra shaping through to the waist dart.
Like all pattern alterations it needs to be tried and tested in a sample before cutting in your best fabric. The basic principles described above can be applied to almost any pattern shape to achieve a FBA and the extra length and width needed over the bust. If you’d like to checkout a couple more posts about FBA’s try these:
Let me know if you have any questions about these alterations in the comments section below. Always happy to help. 🙂
No Comments